Quantcast
Channel: BLITZOLOGY
Viewing all 330 articles
Browse latest View live

Superbowl Preview Part II: New York Giants Blitz Package

$
0
0
Giants defensive coordinator Perry Fewell is not known as a blitzing coach. New York tends to utilize a four man pass rush but the Giant playbook does contain some nice blitzes.
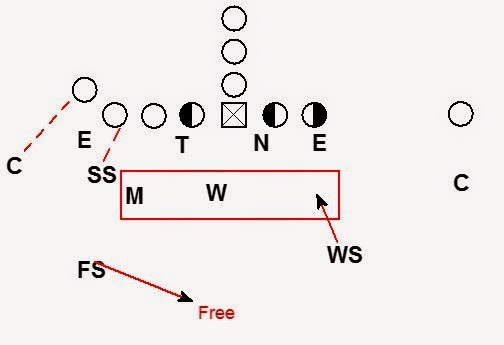
Here the Giants are in a 4-2-5 Nickel personnel group running a weak side overload blitz.
  • LDE-Contain Rush
  • RDE-Loop to opposite A gap
  • LDT - Jab to A gap, Rush B Gap
  • RDT - Work to Contain Rush
  • Mike - Align in A gap, pop out an Man cover TE
  • Will - Align in A gap, rush A gap (Key blitz the RB)
  • S - Rotate pre-snap, Edge Blitz (Key blitz the RB)
  • S - Free
  • Corners & Nickel - Press Man
The key blitz concept by the Will and S is used to allow for both a 6 man pass rush and Man Free Coverage. Traditional 6 man blitzes require man to man coverage with no safety help because the defense must cover the 5 eligible receiving threats with the 5 non-rushing defenders. Most man free blitzes are 5 man rushes with 5 defenders in man coverage on the 5 eligible receivers and 1 free defender (commonly a safety) helping the man coverage players. The key rush allows the Will and Safety to share the responsibility for the RB. Whichever defender the RB steps to block has him in man coverage while the other continues to pass rush. Here is video of this blitz from New York's week 5 game against the Seahawks:


 The Seattle pass protection has 6 blockers for 6 pass rushers but the Giants still have a free rusher. How?
The Giants attack the protection first using a deep safety in the pressure. The offense does not readily identify Safety Dion Grant as a blitz threat allowing the Giants to create a 4 on 3 pass rush to the right side.

The Center becomes the most important player in the protection. If the Center helps to the defensive right the offense can pick up the pressure. The Giants maintain their 4 vs. 3 advantage by manipulating the blocking of the Center. By walking the Mike up toward the A gap, New York presents an immediate gap threat to the Center. To prevent the Center from helping to the blitz side once the Mike drops out the left DT jabs to the A gap. Now the Center feels an A gap threat and looks to help the Guard with the Left DT. Once the DT feels the help from the Center, he works back to the B gap. Because the Center is occupied the looping DE is left unblocked.
The pressure has added effectiveness because the blitzing Will linebacker engages with the right guard. The running back and guard end up blocking the Will leaving the Safety off the edge unblocked.
 Look for Perry Fewell to dial up a limited number of well designed and well executed blitzes vs. the Patriots in the Superbowl.

Be sure to check out the Patriots Superbowl blitz preview here.

Clinics

$
0
0
What clinics have you attended/do you plan to attend this off-season? Have you seen any speakers that you really liked? Leave a comment.

A Simple Adjustable 4-2-5 Zone Blitz vs. Spread Offenses

$
0
0
The 4-2-5 has evolved from two places the 4-4 and the 4-3 nickel sub package. The 4-4 background of the 4-2-5 provides great solutions for loading the box to stop the run as well as dealing with two back formations. When dealing with spread formations however, it is often helpful to draw on the 4-3 nickel roots of the 4-2-5. The following zone blitz comes directly from traditional 4-3 thinking.

Blitz terms defined:
Boss - Backer or SS blitz
Boss Back - Backer or SS to the back blitzes
Boss Bob - Backer or SS opposite the back blitzes

Coverage Terms defined:
Back Spin - Safety to the back Spins down to the Seam
Bob Spin - Safety opposite the back Spins down to the Seam


This naming system is built similarly to the TCU concept of building sentences.

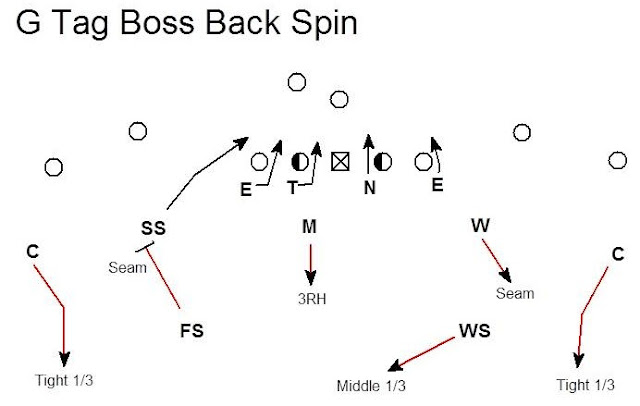
G tells the Nose to align in a 2i

Tag - Tackle move to A gap

Boss - The Backer or SS aligned to the back blitzes. In this case the SS is the blitzer. The SS must make a "Fire" call to tell the End to his side to go inside. The Backer who is aligned away from the back has the Seam.

Back Spin - The high safety to the Back spins down to the Seam. The high safety away from the back has the middle 1/3

Spin - tells the Corners to play Tight 1/3 technique and the Mike to play the 3 Receiver Hook drop


Here is the same blitz vs. a 3x1 formation.
The only adjustments are the alignments of the inside linebackers. The Mike must widen his alignment to handle the 3RH drop. The Will can tighten his alignment to the core with no split #2 pass threat. The Will can now defend the open B gap opposite the blitz.


If the back is aligned to the Backer (Will) the backer is the blitzer and the SS is a Seam dropper. The Will backer must make a "Fire" call to the end to his side telling him to go inside. The high safeties know the spin is going to the back. The Weak Safety spins down to the Seam while the Free Safety rotates to the Middle 1/3.

In this example the blitz is now being run opposite the back (Bob = Blitz Opposite the Back). The Backer is opposite the back so the Will blitzes. The SS is aligned to the back making him a Seam dropper. The high safeties spin opposite the back.

Other situations that must be addressed with this type of variable blitz are:
1. Where is the blitz coming from if the offense does not have an offset back (pistol or under center)?
2. What to do if the offense moves the back? Can we reset the blitz or do we lock it on?

The Boss concept can also be used vs. TE sets.

In this example the blitz is being run to the Y or TE. All of the rules remain the same.

The naming structure of building sentences is designed for a wristband driven defense. This system allows the defensive coordinator the flexibility to have multiple variable blitzes on any given wristband. The Boss blitz can be used to bring pressure where ever the defense wants to bring it with a simple tag word.

Equipment Review

$
0
0
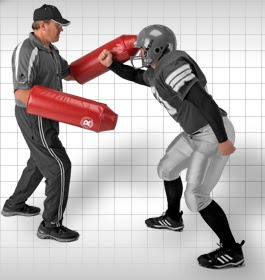
This past season we used our new pass rush equipment. We purchased a set of 4 Rogers Titan pop-up dummies.

The pop-ups have been great and held up very well. They are by far the best pop-ups I have ever used. Buying the set of four has allowed our defense to expand our arsenal of pass rush drills. Other position groups like the DB's are putting them to work as well. We throw to the pop-up as if it is a receiver and the DB breaks on the ball. This allows us to work very aggressive drills even without pads while limiting the risk of injury. We also purchased the attachable QB arms.


I was skeptical of the QB arms. I have not had good experiences with this type of product in the past. However, I have been pleasantly surprised with the arms. The attachment to the pop-up is sturdy and has had no problems with sagging (which was a problem with other arm attachments I have used in the past). The durability is good and the arms held up better than expected throughout the season. 

Next, season we are adding the bullet arms.

I have a bunch of pass rush drills that I can't wait to try out with the bullet arms. If they work out as well as the pop-ups they will have been a good investment.  


Torch: Lighting Up the Offense with a Read Twist

$
0
0
Twists can be used to great effect in disrupting an offense. Unfortunately, twists can also create gap control/pass rush lane issues for the defense. When a twist is called to the right place at the right time the result is defensive success. The challenge is getting the twist to the right place the highest percentage of the time. One solution is to have the defensive linemen read the twist to determine who will penetrate and who will loop. Torch is a read twist by the interior defensive linemen. TORCH stands for Tackles Read the Center. The DT's can be aligned in a heavy 3 and 2i, 2 head up 2's or in 2 inside shade 2i's to run the twist. Both DT's step initially inside and read the block of the center.


The rules are:
  • If the center blocks away from you - Penetrate
  • If the center blocks toward you - Loop
Here the center blocked toward the Tackle and away from the Nose. The Nose reads the center blocking away and continues to penetrate to the opposite A gap. The Tackle has the center blocking toward him and will use his hands on the center then loop over the top of the penetrating Nose.
Here the Tackle reads the center away and penetrates. The Nose reads the center blocking toward and loops.

Torch is an effective pass rush stunt. 


When the center pass sets toward the Nose the Tackle becomes the penetrator. This is a 1 on 1 inside pass rush against the guard for the Tackle. The initial inside step by the Nose holds the center's attention and prevents help by the center on the penetrator. Our Tackles beat the guard's block in this situation a percentage of the time. The rest of the time the Tackle's penetration disrupts the QB's footwork. The QB has difficulty stepping up into the throw when the penetrator is on the midline. If the QB's does not attempt to step up, the contain rushing DE's have a great opportunity to collapse the pocket. Often the QB's most viable option is to slide in the pocket away from the penetration.
 The QB feels open space to step into a throw or to use as an escape lane. As the QB slides into the open space the Nose loops into the same space and pressures the passer.
When the center pass sets to the Tackle typically the offense is in some form of slide protection. The Nose now has the 1 on 1 inside pass rush. The Tackle will loop and apply late pressure on the QB as he slides in the pocket away from the penetration.

Torch is also good against the run.
Against power the center will always block back away from the play. Therefore, the looping DT will always be looping into the play. The play side offensive tackle is combo-ing to the backside ILB and is not looking for a looping DT. We have also had success against power with the penetrator disrupting the path of the pulling guard. Torch is similarly effective against any other gap scheme play with down blocks and a puller (Counter, Trap, Pin&Pull Stretch or Toss, the Wing-T, etc.) 


Against zone blocking the center will block play side. The penetration forces the running back to cut back directly into the looper. 

Torch is effective vs. the run and the pass. The negative is the investment time to get good at running it. One simple drill we use to teach Torch requires two DT's, a coach/player , two garbage cans, and a hand shield.
The coach lines up as the center holding the hand shield. The garbage cans stand in as guards. The Tackle and Nose react to the movement of the hand shield as the ball. The DT's take their initial step then either penetrate or loop. In the first reps of the drill, I tell the DL where I am going to step. They know pre-snap if they are a looper or a penetrator. The focus on the reps where the DL know what is going to happen is the technique of the twist. Both DL must focus on get-off. When DL are first taught the Torch concept in install meeting they often equate reading the block with slow off the ball. We work hard to make sure they react to the ball and re-establish the L.O.S. on their first step when Torch is called. The other coaching point for the penetrator is to get to an aiming point in the opposite A gap. For the looper the key is to shock the hand shield and use great block shed technique before looping. The center is stepping toward you to block you. You must shock & shed before your loop. 
Once we get everyone reps where they know pre-snap what they are going to do, we transition into the DT's  not knowing where the center will block. The DT's must now react to the center while maintaining great technique as in the early reps. I like to put a player at center on these reps. The drill is simple and very rapid fire. Every DT can get a bunch of reps in a 5 minute period of practice. 

Our defensive tackles have taken a great deal of ownership in Torch. I think they feel it is "THEIR" call in the same way a linebacker feels about a blitz. Torch is a nice addition to your arsenal if you are looking for a way to twist to the right place more often.


I can't believe I have to write this....

$
0
0
To the person who posted the racial slur in the comment section of the Green Bay Packer's Nickel package post. Football player is a label that transcends all other labels: race, ethnicity, religion, political affiliation, etc. If there was ever a place that most embodies Dr. Martin Luther King's "I have a dream" speech it is on the football field. You are judged by your play. I have said many times to my players "Whoever you are, put it on film.". That is how football players are defined. I have erased your comment. I have changed the settings on comments to insure that every comment is now approved before going up on the site.

Improve Defensive Game Plans with a Challenge Meeting

$
0
0
Challenge meetings helped improve our defensive preparation this season. We continued our weekly schedule of self-scout, opponent scout, and game plan brainstorm. Following the development of our initial game plan, we added a challenge meeting. The concept is to present each element of the game plan, followed by the coaching staff challenging the idea. Every possible stress or negative outcome of the call should be discussed.

Bottom Line – WHY IS THIS CALL A BAD IDEA?

Internal staff debate is nothing new. However, debate does not happen naturally in all staff situations. Some individuals shy away from arguing for fear of being labeled as negative. Anxiety also exists about appearing as “not a team player” or being interested only in getting their way. Others worry voicing opinions will be viewed as a personal attack. These reservations about challenging ideas often lead to silence and groupthink.

“If everybody is thinking alike, then somebody isn’t thinking” – General George S. Patton

By having a meeting dedicated to challenging ideas, everyone on the staff is required to be a contrarian. Members of the staff are expected to discuss concerns about a call, resulting in a healthy environment for debate.

The challenge meeting had a positive impact on every type of coach on our staff. Older coaches could speak from their experiences without feeling like they were lecturing. Younger coaches now had a forum to question more experienced guys. Each position coach gained insight from hearing the concerns of other position groups. Traditionalist coaches on staff who say “this is what we have done successfully” were forced to consider changes and adjustments to the scheme. They even argued for changes at times. Coaches who might have otherwise become “Yes” men instead began thinking more critically and joined the conversation. Innovative coaches had a platform to pitch their ideas. Those coaches who supported an idea were forced to consider the possible negative outcomes. Conversely, those who didn’t like a call had to consider the positives. As no call is perfect, I believe the challenge meeting process greatly improved our staff’s assessment of the risk and reward of each call. The process also helped remind us that just because we can call something does not mean that we should. Overall these meetings helped us fortify our defensive identity while helping build our toolbox.

When we are done with the challenge meeting everyone has had a say. We have weighed the positives and negatives allowing our staff to more thoroughly understand the rationale for every call. Increased coach’s input and understanding resulted in greater buy in and improved delivery to the team. These challenge meetings also helped inform our staff of trouble areas in the game plan that had to be addressed in practice. We became more proactive coaches and players built confidence knowing we had anticipated problems instead of reacted to them.

The challenge meetings also helped us develop our 2nd plan. By better understanding the stress areas of our game plan we were better able to plan for the adjustments we might have to make during the game.

Challenge meetings might not be right for every staff. If you are looking for a way to spur debate, discussion, and the flow of ideas a challenge meeting can help.

4-2-5 Cover 3 Zone Blitz vs. Empty

$
0
0
Here is a simple effective zone blitz that can be checked to from a 4-2-5 personnel versus empty formations.


The Coverage:

Corners - Fire Zone 1/3

FS - FZ Middle 1/3

SS & WS - Seams

LB to pass strength - 3RH


The SS can play outside leverage on #2 strong to help defend bubble to #3. Having the LB to the #3 receiver strong allows for sound defense against the stick route by #3.


If the offense puts the strength of the formation to the boundary the LB to the pass strength is still the 3RH dropper.

The rush:

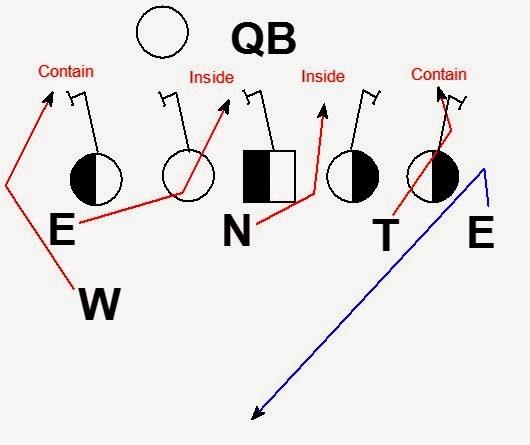
Call Side DE  - Loop to the middle rush lane. Keep getting up the field while looping. Aiming point is the middle of the QB.

DT - Get width to contain. Aiming point QB's up field shoulder.

LB away from the pass strength - Align in call side A gap, Blitz A gap. Aiming point QB near hip.

Nose - Cross face to the B gap. Aiming point QB's near hip.

Away Side DE  - Contain Rush. Aiming Point QB's up field shoulder.


If the offense is setting the center to the walked up LB in the A gap the looping DE has a great pressure opportunity. The center will be forced to get depth quickly vs. the blitzing LB. Often the center is occupied with the LB and does not see the looping end. Offensive linemen are also less likely to look for a twist when there is an immediate A gap blitzer. Twists are most likely to be from two defensive linemen not from two DL and a blitzing LB. The OG opposite the looper will be occupied with the nose. As the guard sets to the Nose, it opens up the midline for the looping DE.

If the offense attempts to react to the looper, the OT and OG will be forced into very difficult blocks.

If the OT to the loop attempts to redirect to the inside and set to the DT, he is forced to make a very difficult block on the DT. The DT has inside leverage on the OT and a direct path to the QB. The OG has the same difficulty when redirecting to the blitzing LB. The other obstacle for the offense is making sure the OT, OG, and Center are all on the same page in exchanging the 3 pass rushers. Pass protection exchanges with a high degree of difficulty for the offense are more prone to a major mistake.

If the OG doesn't redirect but the OT and Center attempt to exchange, the blitzing LB can end up unblocked.

If the offense uses a full slide protection, either the call or away side DE is unblocked.
 
If the offense full slides to the looper, the DE opposite is a free rusher. Also the Nose has a excellent opportunity to ricochet off the pass set of the OT. The block for the OT is difficult and creates a good inside pass rush opportunity for the Nose.


As the looping DE gets off the ball vertically, he will abort the loop if the OT down blocks. Against full slide the OT will block down and the call side DE will be unblocked.

The blitz is also good versus QB draw.

The looping DE is very difficult for the QB draw blocking. Often the looper is going where the QB is trying to run.


Against a pull scheme QB draw, the blitz is still good. The puller has a very difficult block vs. the walked up blitzer. The looping DE is again going to be looping to where the QB is trying to run.


4-2-5 Quarters Fire Zone Coverage Pressure

$
0
0
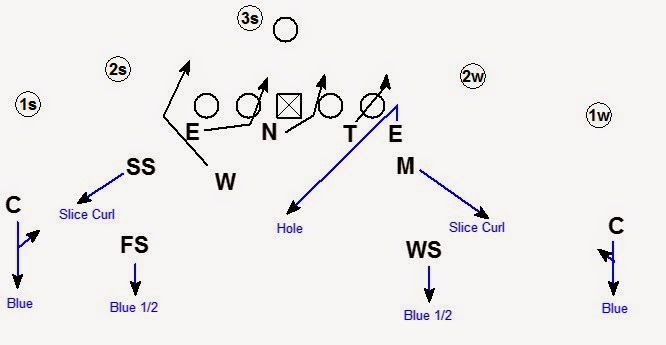
Here is a non-traditional four man pressure call. The coverage concept uses quarters versus 2x2 formations and cover 3 concept versus trips.


 The Coverage:

To the call side the FS, SS, & Corner play read cover 2 coverage. (TCU's Blue concept)

To the away side the Mike, WS, & Corner play read cover 2 coverage (TCU's Blue concept)

The DE drops to the Hole. The hole is 10 yards deep directly over the center.

The Rush:

Will - Contain Blitz. Aiming point on the QB's up field shoulder.

End - Long stick to inside rush lane. Two way go on the OG. Aiming point near hip of the QB.

Nose - Cross center's face to opposite inside rush lane.  Aiming point near hip of the QB.

Tackle - Get width through B Gap to contain. Aiming point on the QB's up field shoulder.


If the offense aligns in a 3x1 formation the coverage checks to a four under 3 deep zone coverage.


Against a 3x1 into the boundary the coverage again rotates to a cover 3 concept to the trips.


For the rush if the center sets to the blitz the Nose and End both have 1 on 1 pass rushes with space to operate.

The result is the OG gets width with the DT, which creates space for the Nose. The center is forced to redirect as the Nose crosses his face. The End has a 2 way go on the guard. With the OG setting to DE the most likely rush for the DE is the inside move on the OG. The Nose should create space for the DE's pass rush by crossing the center's face.


If the center sets away from the blitz the End should have a good inside rush versus the OT. The OG is focused on the Nose initially which should create space for the End. The End has to beat the OT 1 on 1 on the inside move. The blitzing Will typically has a 1 on 1 with the RB.

This pressure also naturally allows the defense to bluff pressure with the Mike.


Against both 2x2 and 3x1 formations the Mike can walk up an show outside blitz while still being able to get to his pass drop responsibilities.


Against the run the Will spills all run blocks to the outside. The DT plays the B gap against the run. The DE does not drop versus the run and plays the C Gap. The SS and Mike handle force in the quarters coverage concept versus 2x2.


Against 3x1 formations the Curl Flat defending players handle Force. In this case the FS and the Mike are the force players.

Press Man Coverage Technique

$
0
0
Here are some coaching points for corners playing press man coverage from the 1999 Texas A&M playbook.


Simple Adjustable 3-4 Blitz vs. Spread Formations

$
0
0
This blitz was submitted by Blitzology reader Jeff Koutsantanou. Coach Koutsantanou is currently the Linebackers coach at the United States Merchant Marine Academy.
Coach Koutsantanou’s Rambo blitz is an adjusted blitz concept run from a 3-4 defensive alignment. The adjustment of the blitz is determining which linebacker will blitz (Mike or Blood) based on the alignment of the running back. The blitz is backed up by man free coverage. Coach Koutsantanou likes this concept against 10 or 11 personnel on 2nd & long or 3rd & obvious pass.

The Coverage:
Corners - Man on #1
Sam - Man #2 Strong
Anchor - Free (Deep Middle)
FS - Man #2 Weak

The Rush:
End – Contain rush to the call
Nose – Rush A gap away from the call
Tackle – If Blood makes “You” Call = Contain
If Blood makes “Me” call rush inside through B gap

Will – Blitz opposite A gap
Mike & Blood
If RB is aligned to your side = Man to Man on RB. This is a rush & engage coverage technique. Force the RB to account for you in the protection.

If the RB is aligned away from you = Blitz
 
Blood - If you are blitzing, Make a “Me” call to the Tackle
If you are man to man on the back, make a “You” call
Mike – If you are blitzing, Blitz B gap
Here the Mike is aligned to the RB so the Mike has him man to man. The Blood is away from the RB and is the blitzer. The Blood must call "Me" to tell the Tackle who has the contain rush.
Here the Blood is manned on the RB and the Mike is blitzing. The Blood makes a "You" call to the Tackle telling him who has contain. The Nose, Will, and End remain constant regardless of the alignment of the RB.
This concept has natural angles for the Mike to blitz the B gap or for the Blood to blitz off the edge.
Against a 3x1 formation the Anchor takes #3 strong and the FS is free. All the other rules remain the same.

The defense does have to answer game plan questions about how to handle:
#1 No Offset Back (Pistol, Under Center, or Empty Backfield)
Coach Koutsantanou's base answer is to treat a pistol backfield as strong. In that case the Mike is man to man on the running back while the Blood is blitzing.
The call can adjust to empty or the call can be checked.


#2 Offenses flipping the alignment of the running back from one side of the center to the other.
Coach Koutsantanou's base answer is reset the blitz with the flip of the RB.
#3 10 or 11 personnel teams that align a non-back in a 2 back formation
Coach Koutsantanou's handles these teams by game plan.
This pressure is favored by Coach Koutsantanou because it is simple to install. The defense can present multiple blitz looks to the offense with a single call. The call's versatility is good vs. hurry up offense. As the offense goes fast and changes the alignment of the back the blitz changes. Coach Koutsantanou uses this template for other blitz variations.
Coach Koutsantanou's Rambo X concept is one example of a blitz variation using the same principles as Rambo.
The coverage rules remain the same. The only adjustment is the blitz path for the linebackers and the Nose. On a Rambo X call the Nose slants to the away B gap. The Blood cheats his alignment to blitz the B gap.

On a Rambo X call the Mike blitzes the opposite A gap. The Mike should let the Will clear before blitzing.

Thanks to Coach Koutsantanou for e-mailing me. If any other coaches would like to submit any aspect of their playbook to be featured on the site please e-mail me.


4-2-5 Cover 1 (Man Free) Coverage

$
0
0
This is the first article in a series about Cover 1 or man free coverage from the 4-2-5 defensive alignment.
 
Against two Back formations the defense will use a funnel technique of two linebackers and one safety vs. the two running backs. Funnel is the name of a 3 on 2 man coverage technique.
 

Against a pro formation the corners handle the #1 receiver to their side. The SS mans up #2 strong. The safety who is going into the funnel makes a funnel and direction call. The linebackers bump their alignment away from the funnel call. In the example above the WS makes the "funnel right" call which bumps the linebackers to the left.
 
Against a two back formation into the boundary the WS will handle the #2 receiver and the SS will be in the funnel.
 
 
 We also have the ability by game plan to use the FS in the funnel against two back formations.

Based on where the offense is running the ball will determine which safety we choose to use in the funnel. Also where offenses are releasing backs into routes will effect which safety we will use. We always prefer for a safety to handle man coverage responsibility if possible. Other factors also determine where we are planning to invert the safety. For example a wing formation.

The wing formation can create a jam packed alignment for the Mike and the SS. It can be easier to have the FS invert against a wing.

Dropping the FS into the box from depth allows the SS and Mike to align without stepping all over one another.

Another example is against weak side run.


Our weak safety may not be a good matchup vs. a fullback on weak side runs. Having the Will block shedding a fullback is typically the better matchup.

The funnel technique is simple. We have 3 defenders for 2 running backs. The funnel player not manned up becomes a zone player dropping to the Hole. The hole is 10 yard deep over the center. The hole player will cover any route crossing his face.

Herethe running backs split. The Mike man covers the 1st back to his side. The WS handles the first back to his side. The Will becomes the hole dropper.

When both backs release to one side the outside of the funnel (here the WS) will take the first back. The middle of the funnel (here the Will) mans up the 2nd running back. The Mike has no back to man cover and drops to the Hole.


When both backs release to the other side the WS ends up with no back to man cover and drops to the hole.

When the offense aligns in spread formations with only one back there is no need for a funnel technique. Against a one back set we use a Fiddle technique. Fiddle is the name of our 2 on 1 technique.


Against a 2x2 formation the Corners man #1 to their side. The SS and WS handle the #2's leaving the FS free. The linebackers have a 2 on 1 (Fiddle) against the running back.

Fiddle technique is very similar to funnel.


The fiddle linebacker to the side of the running back's release has him man to man. The linebacker opposite the back drops to the hole.
 
Against 3x1 the FS will handle #3 and the WS will be free.
 
Against spread teams we often play combo coverage on #2 & #3. By playing outside alignment on the #2 the SS is able to better defend bubble to #3.


Depending on game plan we can lock the DB's. It is critical the DB's align at different depths (Levels) to prevent pick routes. Here the SS is playing aggressively on #2. The FS is aligned deeper.


If we want the FS to play more aggressively vs. the #3 receiver the SS must play deeper to avoid being picked.


When #3 is a TE or an H back aligned on the hip there is no threat of bubble to #3. In this case we will lock the SS and FS. This allows the FS to aggressively play the run when the TE blocks.

 
Against 3x1 into the boundary we can combo or lock & level. The SS will be the free player in this situation.
 
 
Against spread teams that choose to use jet motion we use our funnel technique.


We play funnel technique and invert the FS against this look. The FS is able to take a good angle to leverage the jet sweep. Linebackers do not have time to bump opposite the funnel call in this situation. This is the same technique we use against teams the motion a WR to the backfield as a pitch player on option concepts.
 
 
If the motion ends up crossing the formation the inverting safety can turn the call from a funnel to a combo.
 
Against a bunch formation we again use the WS as the free player and play combo coverage.
 

The SS plays outside leverage on the #2 receiver in the bunch and has #2 in press man. We align the SS outside to help the run support to the bunch. The FS and Corner combo cover the #1 and #3 in the bunch.

 
By game plan we can lock and level the bunch formation. One reason we lock and level is to use our Oscar adjustment in cover 1.

 
The Oscar call is a double on the outside receiver in the bunch by the corner and the free player.

 
We use the Oscar adjustment to allow the corner to crack replace aggressively vs. crack toss. With the SS aligned outside leverage on #2 the corner should have a clear picture when #1 is crack blockings.

 
The corner can be aggressive on the crack replace without worrying about the play action off the crack toss.
 
Those are the basic man matchups in cover 1. If there are other formations and motions you would like to see in a follow up post leave a comment or send an e-mail.
 

7 Man Overload Blitz from the Bear Front

$
0
0
There are multiple ways to get to the Bear front alignment. If you align in the bear from a 4-3, 4-2-5, 3-4, or 3-3-5 personnel this blitz is a possibility. The coverage is cover zero with the defensive line accounting for the running back in coverage.


The Rush:

Ends: Contain Rush, Peel if the running back crosses your face in a route

Tackles : Inside Rush through the B gap, Read the block of the Guard

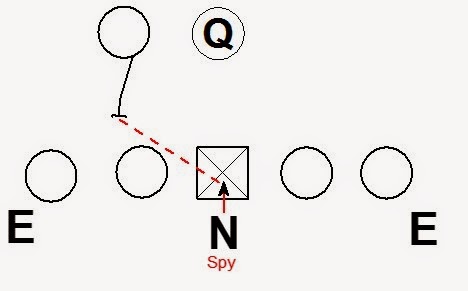
Nose - Engage the Center, Spy the running back

Mike & Will - Inside blitz your A gap

The Coverage:
Corners - Man #1
Safeties - Man #2 or #3 in a 3x1 formation away from you.


Spy & Peel Technique
The Nose will get off the ball and engage the center. Once engaged the Nose should get his eyes to the running back.

If the running back steps up inside, the Nose will disengage the center and man cover the back.

This technique should put the Nose in great position to defend any running back screen concepts.

If the running back blocks one of the blitzing linebackers the Nose becomes an extra rusher.


The linebacker is an inside blitzer and will always attack the block of the running back to the inside. By attacking the inside of the running back, the linebacker will disrupt the QB's rhythm and footwork. The Nose will work to the outside of the block. The Nose must be aware of the RB chipping the linebacker before running a screen. If the back does block the Will, the Nose should be in good position to clean up the QB if the Will does not get the sack.

If the running back releases, the End will handle covering him in man coverage.


The Nose will go to cover the running back. As the back is picked up by the End, the Nose will replace the End as the contain rusher.

Read Technique


Both Tackles have read technique. The DT's are getting off on the snap and attacking the guards. If the guard pass sets to the DT, the DT drops outside looking for a hot throw. The depth for the DT's drop is 3-5 yards. If the guard does not set to the DT, the DT continues to pass rush through the B gap. Depending on the blocking scheme one, both, or neither DT could drop.


The defense is presenting 4 rushers to the right (End, Tackle, Mike, and Nose) the offense only has 3 blockers (RT, RG, Center). The extra (unblocked) rusher should force a hot throw. The right DT is reading out and should drop hot. 

To the left the offense has 3 blockers (LT, LG, and RB) for 3 rushers (End, Tackle, and Will). 

If the center attempts to create a 3 vs. 3 to the right (Center, RG, RT for End, Tackle, Mike) the defense has a 4 on 3 overload to the running back. The Will should attack the RB to the inside while the Nose works to the outside of the RB. 

Cover 1(Man Free) Technique

$
0
0
This is the second post is a series about Cover 1 (Man Free) from a 4-2-5 defensive personnel. The focus of this post is the man technique of the safeties covering an inside (#2 or #3) receiver.  Some terms in this post reference the techniques described in the first post. You may also notice, many of these techniques are similar to the fire zone coverage concepts covered on Blitzology in the past.

Against a normal split receiver, the safety will take an outside leverage alignment. He can expect inside help on short inside routes from the Hole player and deep inside help from the Free player.


 A wide split takes the DB further from his inside help. In that case the DB will adjust to inside leverage to deny the easiest throws.


The DB’s eyes are on the WR’s hip. 

Where the hip goes tells the DB how to react.

Outside
When the receiver’s hip is outside the DB should be in good position to get in phase and cover the flat route. 

While getting in phase, he must be able to access the difference between a flat route and a wheel route.

Many times the WR takes a more vertical path to the flat when running a wheel. DB’s must also look for the differences between flat vs. wheel routes in film study.

Vertical
When the receiver’s hip is vertical, the DB should get hands on the WR from the outside in and get in phase. We want the DB to see through WR to the QB. Throughout the route, he must maintain body position for outside breaking routes.


The most challenging outside breaking route is the corner. For the safety to be successful he must make an efficient man turn into the route. Once in phase, the goal for the DB is to lean on the WR forcing the route as vertical as possible. 

This action plays out like a corner leaning on a fade route. Instead of leaning the route into the sideline, the safety leans the route to the free player.

If the WR runs a vertical or go route, the DB must defend any throws on a line (including back shoulder throws). By playing the vertical aggressively with the man coverage, the QB should be forced to put air on the vertical throw. Throws over the top of the man coverage should be handled by the free player.


Inside
When the receiver’s hip is inside, the DB will use a Cut, Squeeze, or Pin technique depending on the depth of the break.

When the hip of the receiver breaks inside immediately the DB should make a “Cut” call to the Hole player. After making the cut call the DB will replace the Hole player. A cut call tells the Hole player to cut off the crossing route in man coverage.


Against the whip route (in & back out) the DB must be patient in order to correctly identify what route the WR is running. On many shallow concepts the WR is running his route at the heels of the DL. Most teams do not run a whip route from an initial release at that depth. Typically the route is deeper when the WR is going to run a whip. 


The DB must recheck a cut WR, looking for a whip route. He should be able to react from going to the hole and recollect the WR to the flat. Film study is crucial in helping the DB identify the difference between a crossing route and a whip route. 

When thinking about cover 1 the question naturally arises: Why not just play true man to man coverage and keep it simple? The cut technique is nuanced and requires practice to perfect. The reason for cut technique is for run support. In a true man coverage, if the receiver blocks inside the DB is going to go cover him. The receiver can occupy his man defender and the player he his blocking creating a 2 on 1 advantage for the offense.


Allowing the DB to make a cut call lets the DB be aggressive attacking the run.


When the hip of the receiver breaks inside at an intermediate depth the DB will use a squeeze technique. The DB should make an “In” call to alert the Hole player there is a route coming. A DB squeezing will trail and strip the receiver. If the WR attempts to settle his route the DB should make the play. Otherwise the DB should squeeze the route to the Hole player. Throws out in front of the WR will be defended by the Hole player. Any other throw should be punched out by the trail and strip DB.


When the WR sticks his foot in the ground and breaks to the post, the DB will use a pin technique. We want the DB to push the post vertical, pinning the post to the safety. By playing outside leverage the DB is naturally going to be in a trial position on the inside post break. The DB will take a low hip position trailing the post. Any throws on a line will be handled by the man coverage. Any throws over the top are the responsibility of the free player.


Putting it all together against a route combination:


Mike & Will are in a fiddle (2 on 1) technique against the back. When the back releases to the Mike’s side the Mike takes him in man coverage. The Will become the Hole player. However, when #2 releases immediately inside the SS makes a “Cut” call and goes to the Hole. The Will cuts the crosser. The WS makes an “In” call and squeezes the in route to the SS in the hole.

If there are route combinations you would like to see diagramed leave a comment or send an e-mail to blitzologyblog@gmail.com .

7 Man Overload Blitz from the Bear Front Part 2

$
0
0
I have received some questions about the 7 man overload blitz from the bear front. One of those questions is how to handle empty formations. When answering this question it is helpful to look at how we align in the bear front from a 4-2-5 personnel.


The Will linebacker is on the line of scrimmage filling the role of a contain rusher. The DE is reduced down to play the away side 3 technique. We bump the SS into the box to fill the role of the 2nd linebacker. If the offense chooses to align or motion to empty the SS adjusts from the box to handle the 5th receiver.


Our Mike will make a check alerting the Nose to rush the A gap. With no back in the backfield to spy, the Nose is free to rush the passer. The 3 techniques keep their read out responsibility.

Against a TE, the contain rusher will align in a 9 technique playing outside. The 9 technique is leveraging all blocks outside in.


The man coverage player is aligned inside and will fit in the C gap. Once the TE blocks the man coverage player can play the run.


We can play the safety in press technique on the TE by game plan. 

Against an H-Back the FS or WS will handle the hip player, while the Nose is still spying the running back. This allows the man coverage safety to mirror the hip player’s blocking. 


When the hip player blocks the man coverage player will be there to provide an extra defender.

Another question that is bound to pop up is how to handle the option. The contain players have pitch and are expected to slow play. The goal is to create indecision and force a late pitch. Contain players must balance slow playing with not being out leveraged by the pitch back. The Nose will disengage the center and work toward the back. With the contain player handling the RB on the pitch, the Nose is freed up to take the QB.


We call a limited number of bear front calls per game. In any game plan we do not necessarily plan to use bear front against every personnel or in every down and distance. We also don’t plan to use this 7 man overload blitz in every situation. Teams playing us however, are forced to be prepared to block all of their plays vs. the bear front. Being prepared for our base defense as well as our change of pace calls like bear limits what an offense can carry in a game plan.

Are bear front adjustments from the 4-2-5 something you guys would like to see more about in an article?

Cover 1 (Man Free) versus Action Passes

$
0
0
This is part three of a series about Cover 1 (Man Free) coverage in the 4-2-5 defense. The topic this time is defending action passes. Our goal is to keep the action pass rules as simple as possible.

Against one back boot from a 2x2 formation:


The Mike and Will are playing Fiddle (2 on 1) technique vs. the running back. On the action the LB’s play run. The LB to the side of the action (here the Will) plays man coverage on the RB once pass is identified. If the RB is running a throwback route the Will must handle the route. The LB away from the action (here the Mike) must open up and cover the crosser. It is critical the Mike plants on this right foot and opens over his left shoulder. If the Mike open’s up over his right shoulder, the crosser will easily run by him. The Mike’s landmark is the hash (college field) at 10 yards from the line of scrimmage. As the Mike gets to the hash, he will find and cover the crosser. We teach the aiming point to get the LB to take an angle that cuts off the crosser. 

The WS will likely make a “cut” call in this situation. He will be late reacting to the pass. Once he identifies the play is a boot, he will work to get back on top of the crossing route. The WS can expect help from a LB. If the crossing route settles before getting to the opposite hash the WS will have the route defended.

The FS will squeeze from the middle of the field to a landmark halfway between the hash and the numbers (college field). This landmark is roughly the high school hash mark.

All other man coverage players remain in man coverage.

Against one back boot from a 3x1 formation:


The LB may not have a crossing route to cover. His reaction and aiming point remain the same (Hash at 10).

Against one back sprint out:


The LB to the RB will go man cover the blocking running back and become an extra pass rusher. The LB away from the sprint will take an angle to the hash at 10. As he works to the hash he should find the crosser.

Against two back boot:


When the backs split on the boot action the outside funnel players (here the WS and Mike) have the RB's man to man. The Mike must be aware of throwback. The middle player in the funnel (here the Will) must cover the crosser by getting to this hash at 10 aiming point. The SS will make a "cut" call end up trailing the crossing route.


When both backs release to the same side, the outside of the funnel (here the WS) and the middle of the funnel (here the Will) have them man to man. The Mike will work to the hash. Against a corner route by #2 the SS will work to lean the corner route vertical to the FS. The free safety should be able to provide more corner route help by working to his new landmark halfway between the numbers and hash.


Cover 1 (Man Free) versus Mesh Route

$
0
0
This post is in response to questions about Cover 1 asked in the comments of the Cover 1 (Man Free) Technique post. 

#1. How do the SS and WS react when both #2’s go underneath immediately?

Both safeties make a cut call. The LB’s have a fiddle on the running back. The RB releases to the Mike so the Mike takes him in man coverage. The hole dropping linebacker (here the Will) cuts any route crossing his face. In this case there are two crossing routes. 


The Will cuts the first route he sees. In this example he cuts the crosser coming from the right (red). Both the SS and WS are going to start working to the Hole. A hole dropper’s rule is to cut any route crossing their face. The WS will see the uncovered crosser from the left (blue) crossing his face and will cut the route. The SS will see the LB covering the crosser (red) and will continue to the hole.

If the Will cuts the blue crosser the SS and WS will switch reactions.


#2. What will it look like if the #2 runs a crosser, #2 runs a dig, and the back releases to the Dig? Can a LB cut a crosser from his own side?

Yes, a LB can cut a crosser from his own side. 


Here the fiddle LB to the RB (Mike) takes him in man to man cover. The LB away from the back (Will) become the hole player and cuts the crosser. The WS makes a cut call and works to the hole. The SS makes and “In” call and squeezes the dig to the WS in the hole.

Buddy Ryan 4-3 and 46 Defensive Resources

Game Planning Coverages

$
0
0
I received an e-mail from a reader asking about coverage philosophy and game planning. So here goes.

Our base coverage concept is a match-up zone quarters. In every game, we plan to run multiple coverages that fall into one of three categories.

Zone – Depth, Vision, & Break coverages. In zone coverage our defenders will drop to the deepest part of a zone with vision on the QB and break on the throw.

Man – Tight aggressive one on one coverage.

Match-Up Zone – Combination of Zone & Man. Based on the pattern run by the offense, we are going to play either zone principles or man principles. Match-Up zone calls allow us to aggressively deny selected routes while playing depth, vision, and break vs. other routes.

When we are game planning coverage our priority list is:
  1. Run Support/Run Adjustments
  2. Action Passes
  3. Quick game/Easy throws
  4. DBP Route Combinations
  5. Specials/Trick Plays

First and foremost, every game plan starts with how to stop the run. How and where our DB’s will fit vs. the run is our first consideration when planning coverage calls. In recent seasons, we have added run adjustments to our stopping the run planning. When I say run adjustments, I’m talking about bubble, WR screen, and pop pass that are built into running plays. We always want to know how our coverage will account for those phases of the offense’s run game.

Next in our thought process is how to handle action passes. Our action pass plan will be tied to our coverage calls to defend the run. Action passes are threats of explosive plays for the offense. We want to have the best plan possible to eliminate explosives.

Third is how will we defend quick game and the easiest throws. Our goal on all quick game is eliminating yards after catch. In zone coverages, we expect our defenders to break on the throw and make sound tackles. In short yardage situations, we have to be able to play a denial coverage (man or match-up) to prevent completions. However, good vision and break from zone coverage can lead to incompletions vs. quick game too. We have been successful with defenders jarring the ball loose on quick game by making a good break and hitting the receiver before the completion of the catch.

Fourth on the list is drop back pass (DBP). We prioritize the offense’s vertical passing plays first among DBP. If the ball is completed over a DB’s head, the other ten defenders don’t get to play. If the ball is thrown underneath, all 11 defenders get to run, rally, and tackle. Every DBP coverage decision we make is evaluated based on how it matches up vertically. Our plan for DBP is built around placing mental demands on the offense. We want the QB to have to identify the coverage post-snap. By disguising and changing up the coverage, we are going to limit the offense’s ability to make a clean pre-snap read. Also by changing up the coverage, we are going to place physical demands on the offense. Take for example a 4 verticals route concept. Against a zone coverage like cover 3, the QB is going to try to throw the ball over the top of the underneath droppers but before the deep defenders. Against quarters, the offense is trying to bend a vertical into the open middle of field attempting to beat a safety 1 on 1. Against, a Cover 1 concept the QB will have to make a man beater throw into a tight window. All three situations are different for the offense. Creating mental demand (What coverage is it?) and physical demand (Making the right kind of throw) while facing a pass rush is our plan to defend DBP.

Lastly, we want to be ready for the trick plays the offense may throw at us.
In game planning, we want to force the offense to react to the coverages we are calling. By changing up the coverage call, we are being proactive. If we are spending all our time reacting to the offense’s calls in game, we have failed in the game planning phase.

How do we actually make this happen in our game plan and execution?

We start our planning with self-scout. What do we run? What tendencies will our opponent see when they break down our film? In the simplest form the offense wants to know:

  • What is our base coverage?
  • What are our complimentary coverages?
  • When do we call them?

Being able to answer these questions for ourselves influences our game plan.

Next, we create our opponent scouting report. The coverage scouting report focuses on what route combinations they have run. How will we defend those routes in our base coverage? We want to look specifically at what has our opponent called against other quarters teams (scouting report). What have they called against us in the past (previous seasons)? What has worked against us in quarters coverage in other games this season (self-scout)? Those are the concepts we need to rep in practice all week. The down and distances when we expect to see those concepts are based on the combination of their tendencies and our self-scout. Our opponent has tendencies on when they like to call certain route concepts. They are also planning for us based on our tendencies. We can anticipate their “quarters beater” route concepts based on their scouting report (What). We can predict they will call those “quarters beaters” in situations they think we will be in quarters from our self-scout (When).  Once we answer what and when, we can build a game plan.

The scouting report also influences our COP calls. C.O.P. is an acronym for change of pace.

For example:
Against quarters, offenses like to get a bender vertical or a post into the open middle of the field. If the scouting report shows that is a concept our opponent likes against quarters, we are going to plan some middle of the field closed COP calls (Cover 3 or Cover 1). In the first quarter we will make some COP calls in quarters coverage tendency situations. Proactively making those calls early, can get a team to abandon the bender/post plan. We don’t want to be reacting to them completing a post and then start making some cover 3/cover 1 calls.

Example 2:
A team on 1st down likes to throw hitch to #1 against quarters to get on schedule. We might mix in some pressed cover 1 in those situations as a COP. In those same situation we will call some press/bail technique quarters. If the offense isn’t sure the hitch will be there, often they will go away from the call. Another COP in this situation is cover 2 concept to deny the hitch. We can show the off alignment inviting the hitch only to have a corner squatting in the flat. We may only want the squat corner to the boundary so our COP might be a quarter-quarter-half concept. In other situations we want to close the middle of the field and get a squat corner. In that case our COP is a rolled cover 3 with the corner to the roll squatting in the flat. Throughout the game we will mix up quarters with COP calls.

Some offense’s like to run route combinations that are difficult for pattern match coverages. Being able to call a zone coverage in those situations can be very beneficial. The offense is expecting the defense to match-up but instead the defenders are playing depth-vision-break technique and forcing the ball to be thrown short. If you are not pattern matching, the routes designed to manipulate pattern match don’t affect your coverage. It doesn’t take many COP calls to get an offense to mark calls off the call sheet. No offensive coordinator likes wasted plays.

One question is what to do in medium and short yardage situations. We are going to start by planning to play our base quarters match-up zone. Our base alignment does not have the corners pressed. To complement our base look we will play 5 underneath zone coverage to overload the underneath zones. Typically it is a cover 2 concept with the corners aligned off the LOS.  

We can also press our corners in quarters or play press man. Our aggressive coverages force precision throws.  We will also show press and bail to a zone. Depending on the situation we may only press the boundary corner. 

This is where the game within the game happens. If we get into short yardage we may play press man the first time. The offense is going to come back with press man beater concept the next short yardage situation. We will come back with bail to our base coverage. We may call our base coverage on short yardage. After practicing our base coverage against their short yardage routes we expect to make the play. If the offense converts, we have a good idea of what short yardage route concept the offense will come back with later in the game. We can help ourselves win the game within a game by using our tendencies and self-scout to our advantage.  If our self-scout shows that our short yardage plan has been press man or bail quarters, we will plan to change up our COP calls.

Running multiple coverages is a simple concept. The issue is how do we get each coverage practiced. Our answer is limitation. When practicing we don’t call every coverage in every situation. By planning to use COP calls in specific situations we can limit the practice time for those coverages. We also try to find situations where COP calls overlap. For example the team may have 1st down tendencies that overlap with 2nd and medium situations. Being able to streamline COP calls for multiple situations can improve practice efficiency.

Overall we are game planning to mix up our zone, man, and match-up zone coverages. If the offense is locked into what coverage we are running, they have the advantage. If we have done a good job planning, we will be locked in to how the offense is going to try to attack the stress areas of our base coverage. We will spend the week being ready to defend the offense in our base coverage. If the plan is good we will have also mitigated the stresses of our base coverage by preparing COP calls. Proactive COP calls should dissuade the offense from calling routes that we want to take away.  Once we have forced the offense into their 2ndor 3rd plan we will have to make in game adjustments.

4-2-5 Overload Zone Blitz

$
0
0
This post is a follow up to the Simple Adjustable 4-2-5 Zone Blitz post. This blitz is designed to overload the pass protection to the field. The coverage is the same fire zone concept used in the Boss blitz from the previous post.


The Coverage:

Corners – Tight 1/3 Technique
FS – Spin down to the Seam
Mike – 3RH
Will – Seam
WS – Middle 1/3


The coverage does not need to be checked vs. a 3x1 formation. The Mike does need to widen his alignment. The Will can cheat his alignment closer to the box.
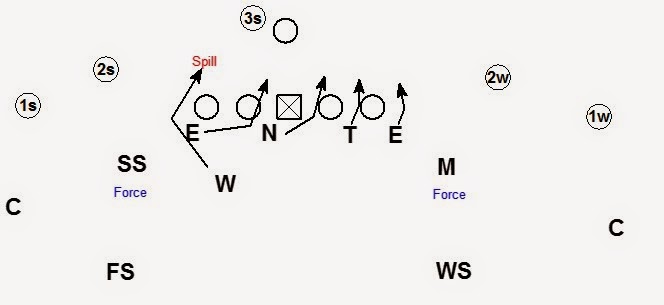
The Rush:

Call DE – Wide Ghost Alignment, Daylight rusher
DT – 4i, Daylight rusher
Nose – Zero, Wiper technique
Away DE – 5 Technique, Contain
SS – Show Alignment with blitz demeanor, Contain

Daylight Rush Technique:
Get off the ball on straight line track to the QB. If there is daylight, stay on your track. If the daylight is gone work a move to the inside to find new daylight.


If the OL inside (here the OG) blocks down there is daylight. Stay on your track.


If the guard sets wide there is daylight. Stay on your track.


If the guard sets on your track, work an inside pass rush move to find new daylight

Wiper Technique:


First step at 45 degrees. Attack edge of OL then work to opposite side of OL. Side to side action like a windshield wiper.

Attacking Protection:
When the offense is using a slide protection to the field.


This is the protection we are hoping to see. The width of the SS, DE, and DT force the offensive linemen to set deep and to block in open space. 


Here the OT sets to the SS and the OG sets to the DE. The wiper technique by the Nose is designed to create hesitation by the Center. The DT has daylight and stays on his track. The Center has a very difficult task to set late to a DT on a straight line run to the QB.


Here the OT sets to the SS and the OG sets the DT. The End has daylight and will stay on this track. The DT does not have daylight and will work a move to the inside. The End should get a straight line run to the QB.


Here the OT sets to the DE and the OG sets to the DT. The SS should have the straight line run to the QB. Both the DE and DT have a blocker on their track. Both will work an inside move to find new daylight.


Here the Center is aggressively sliding and ignoring the Nose on the wiper. The Nose will stay on his initial path. This will take him as far from the OG as possible. This block is very difficult for the guard.


When the RB is aligned to the field the Nose will change his technique from wiper to a normal slant to the away A gap. We are expecting the slide of the OL is going to the boundary in this situation. The OT has the DE man to man, the OG has the DT, and the Center has the Nose. The OG and OT to the right are sliding. We want the Nose to slant instead of wiper to create space for the DT and DE to the blitz. Both the daylight rushers have a blocker on their track. Both will work a move to the inside to find new daylight. We expect our DL to win these 1 on 1 matchups in open space. 

Change Up:


Our changeup is to switch the job of the DE to contain and allow the SS to be a daylight rusher. The SS will align with inside foot back. His 1st step is with his inside foot up the field. His 2nd step is with is outside foot up the field. The SS should plant on the 2nd step and get on his track. 

When we call this blitz we allow the SS to call the rush at the LOS. The SS will tell the DE who has contain with a "You" or "Me" call.  


Viewing all 330 articles
Browse latest View live