Quantcast
Channel: BLITZOLOGY
Viewing all 330 articles
Browse latest View live

Blitz the Formation Concept from the 4-3 Defense

$
0
0
Coach Jerry Gordon is the author of Coaching the Under Front Defense.


If you are interested in learning about the under front/defensive football, I highly recommend reading it. Coach Gordon has just launched a new website CoachJerryGordon.com. The book and ibook are available to order on the site. 

In the spirit of Coach Gordon’s new website, I thought I would feature a blitz the formation concept from the 4-3 defense. This blitz is from the 1996 Miami Hurricanes defensive playbook. 1996 was during the Butch Davis era at The U. 

Canes Check Blitz

The blitz is a 6 man pressure that adjusts based on the backfield set. The coverage is cover zero man. The blitz was designed for personnel groups using a TE.

Sam: run Shoot or Under
Mike: man on running back
Will: run Hard, Gap Crash, or Shoot
Will must communicate “Hard”, “Gap”, or “Shoot” to the DE

I backs:


Sam – Shoot

Shoot coaching points:
Sam - blitz primary run gap (C gap), come under block of RB

Will – Call “Gap” to DE, run Gap Crash

Gap Crash coaching points:
DE – Rip across face of OT, work up field in B Gap
Will – Cross over and attack flat off the OT’s hip

Against the pass the Sam turns the shoot blitz into an under blitz.


Under coaching points:
DT – Rip up field in gap
Sam – Blitz under DT in A gap

This concept provides a shoot blitz against the run to attack TE side run game. Against the pass the blitz converts to a pass rush blitz. The weak side crash blitz by the Will is good vs. split end side runs.

Far backs:


Sam – Run Under
Will – Call “Hard” to DE, run Hard

Hard coaching points:
DE – Jab step to OT, Loop behind Will, Alley & Contain rush
Will – Cross over and attack flat off the OT’s hip

Split Backs:


Sam – Under
Will – Call “Shoot” to DE, run Shoot

Shoot coaching points:
DE – Rip up field (C gap)
Will – Blitz primary run gap (B gap)

One Back:


Sam – Under
Will – Call “Shoot” to DE, run Shoot
Will widen alignment to the formation.

The complement to the Canes Check Blitz is the Eagle Check Blitz.

Eagle Check Blitz

DT away from call – Pinch vs. all looks

Sam: run Under or Contain Blitz
Sam must communicate “Contain” or “Razor” to the DE

Mike: man on running back

Will: run Hard, Gap Crash, or Shoot
Will must communicate “Hard”, “Gap”, or “Shoot” to the DE

I backs:


Sam – Call “Contain” to the DE, run Under
Will – Call “Gap” to DE, run Gap Crash

Far backs:


Sam – Call “Razor” to the DE, run Contain Blitz
Razor sends the DE to the B gap
Will – Call “Hard” to DE, run Hard

Split back:


Sam – Call “Contain” to DE, run Under
Will – Call “Shoot” to DE, run Shoot

One Back:


Sam – Call “Contain” to DE, run Under
Will – Call “Shoot” to DE, run Shoot
Will widen alignment to the formation.


4-2-5 Basics: Alignment of the DL in a Divorced Front Concept

$
0
0
This is the first post in a series about Basics of the 4-2-5 Defense. Let me start with two disclaimers.

  1. I am going to try to use generic terminology when discussing the 4-2-5. There is no universal terminology in football.
  2. This series of posts is not comprehensive. The terms, concepts, and schemes I am writing about will not cover every 4-2-5 scheme being run everywhere.


So here we go. The 4-2-5 provides the platform to be multiple. 4-2-5 schemes have roots in 4-4, 4-3, and Nickel defenses. Combining elements from each scheme is what gives the 4-2-5 its versatility.  

Drawing on the scheme’s nickel roots gives 4-2-5 teams the ability to run a divorced front concept. The idea is the front 6 align based on front alignment rules. 


The DB’s align based on secondary alignment rules. Because the front and defensive backs have independent alignment rules the front is “divorced” from the secondary.

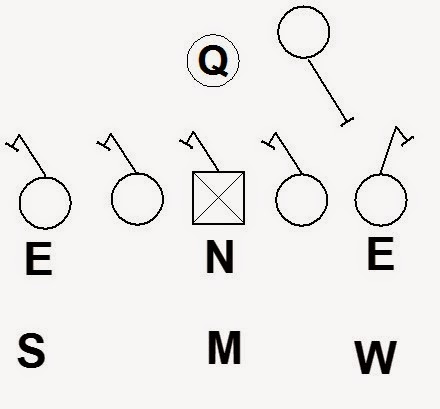
Looking at setting the front 6 defenders, there are a number of options. For the following discussion we are going to start with a basic front.


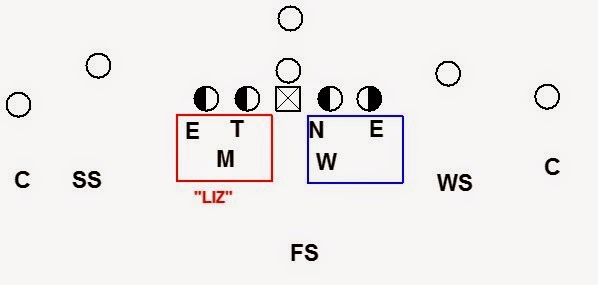
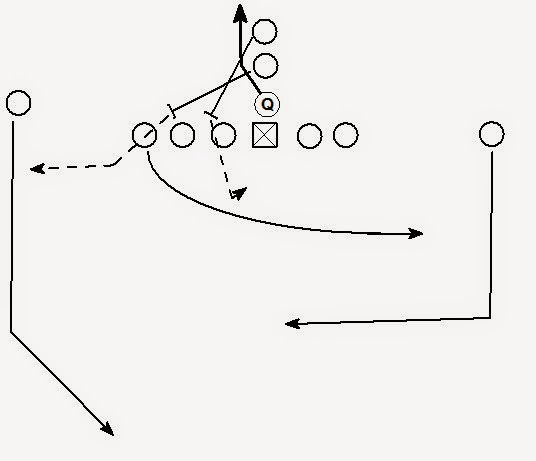
This example is a G front with the DE's in 5 techniques, the DT in a 3, the Nose in a 2i, the Mike responsible for the A gap, and the Will responsible for the B gap.

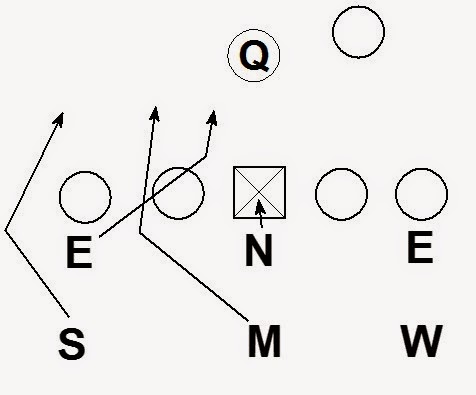
Getting the front lined up usually involves a LB making a declaration that tells the front where to go.


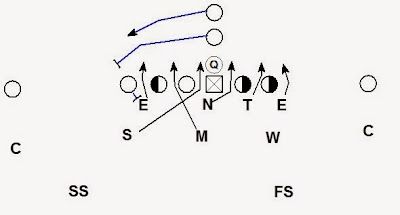
Here the DE, DT, and Mike travel together and go to the call. If the LB calls “Liz” those 3 players go to the left. The DE, Nose, and Will travel together and go away from the call. 

When the LB calls “Rip” the DE, DT, and Mike align to the right and the DE, Nose, and Will go to the left.


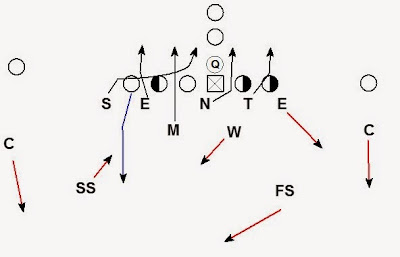
This is certainly not the only way to do it. Some teams set the front based on the Nose.

Here the DE, Nose, Will go to the call and the DE, DT, and Mike go away.


I think this choice comes down to how the defensive coordinator thinks. If the coordinator thinks about the front based on the 3 tech, it makes sense to set the front based on the 3. If the coordinator visualizes the defense based on the Nose, the front should get set based on the Nose.

Another choice some defenses make is using a right and left DE instead of them traveling to and away from the call. A Right and Left system is great for helping the DE’s get lined up. The DE’s know where they are going without a call. The DE’s also get to develop the consistency of stance, vision, and muscle memory from always being on the same side. The drawback of using right and left is the defense has less control over aligning the DE’s where they want them every time. Another consideration of Call/Away DE vs. Right/Left DE is the similarity of the players at those positions. If the DE’s on a team have similar profiles, a right/left system may be the way to go. If the DE’s have different profiles, the defense may want more control over where they are aligned.

When it comes to setting the front the defense can have the LB set the front anywhere it wants.

Strong/Weak

Strong - Make the Rip/Liz call to the pass strength (higher number of receivers).


Weak – Make the Rip/Liz call away from the pass strength


When setting the front strong/weak the defense must have a plan to deal with a balanced formation.


Field/Boundary (Some teams call this Wide/Short)

Field – Make the Rip/Liz call to the wide field


Boundary – Make the Rip/Liz call to the short side of the field.


Tite/Split (Some teams call this Closed/Open)

Tite – Make the Rip/Liz call to the TE


Split – Make the Rip/Liz call away from the TE


When setting the front Tite/Split the defense must have a plan to deal with when the offense flexes the TE. The defense must also have a plan to handle TE trade. There must also be rules to handle two TE’s sets.

Heavy/Lite (I have seen a bunch of other names for this concept)

Heavy – Make the Rip/Liz call to an offset back


This could be an offset back in the shotgun or an offset fullback.


Lite – Make the Rip/Liz call away from the offset back

The defense must consider what to call when there is no offset back (pistol or under center). Also the defense has to consider what to do against running back motion.

Rip/Liz

The defensive coordinator can set the front right or left.

If there is another place the defense wants to set the front, all the defense needs is a word. Because the front is divorced from the coverage the defensive coordinator can get more from less. With one front (G) and one coverage (3) the defense has the flexibility of 10+ calls.

  1. Field G 3
  2. Boundary G 3
  3. Tite G 3
  4. Split G 3
  5. Strong G 3
  6. Weak G 3
  7. Heavy G 3
  8. Lite G 3
  9. Rip G 3
  10. Liz G 3

These calls fall into 1 of 2 basic categories: guaranteed calls or conditional calls. Guaranteed calls like Field, Boundary, Rip, and Liz are going to be there no matter what the offense does. The conditional calls like Strong, Weak, Tite, Split, Heavy, and Lite are dependent on the how the offense aligns. When calling conditional calls the defense must have solutions for dealing with an offense who changes the condition after the defense has set the front.

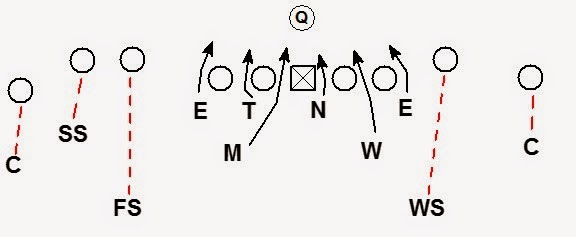
Take for example a 21 personnel team who has strong TE run tendencies. That may lead the defense to plan on setting the front Tite. If the offense trades the TE, how will the defense respond? Here are some of the options.


Nothing– The defense has the ability to do nothing. The result is the defense ends up in the same look it would be in if the front had been set split. 


If when the TE trades the defense adjusts very little, it sends a powerful message to the offense. The offense is looking at how the defense reacts. If the offense moves 1 player and the defense moves 6 in response, you can expect to see the offense continue to trade the TE trying to make 6 defenders move before every snap. If the defense doesn’t have many players moving on the trade, the offense may decide trading the TE is not worth their effort.

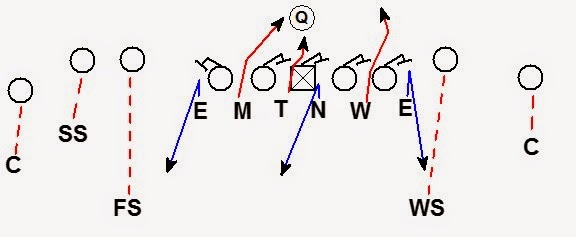
Reset– If the defense wants to get the front to the TE, the defense can reset the front. Here the original call is “Liz”. When the TE trades the LB makes a “Reset Rip” call. 


The Tackle and Nose switch and the Mike and Will switch. The DE’s stay on their side. It is often too far of a run to get the DE’s reset.


The final result is the defense back to having the front set Tite. Resetting the front may not be fast enough to deal with the offense. 

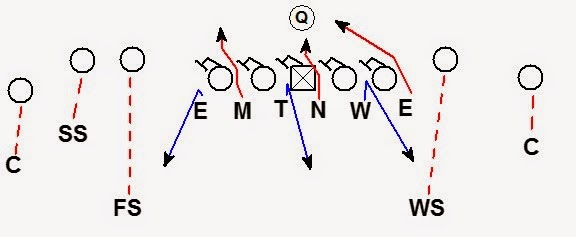
Slide– Slide is an option the defense can use that allows the defense to get a 3 technique to the TE in a different way. Here the LB calls “Slide” to the DL. 


This tells the Tackle and Nose to slide their alignments pre-snap. The Nose becomes a 3 technique, and the tackle becomes the 2i. 


The drawback of this solution is the Nose and Tackle now have to play new techniques. Also the Mike and Will have new run fits when the front is in a slide alignment.

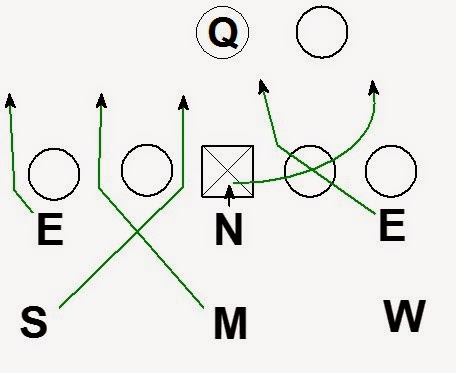
Slant– The DL can slant when the TE trades. Here the LB calls “Slant” when the TE trades. The Tackle and Nose slant post-snap which gets the defense back to a Tite front look.


That is the basic concept of a divorced front. Not all 4-2-5 defenses run a divorced front this way. Not all 4-2-5 defenses choose to run a divorced front at all. Let me know if this similar to what you are running in the comments. If you do something different leave that in the comments too.

Using One Word Calls to Blitz Tempo Offenses

$
0
0
Here is a simple system to package and use one word calls for an adjustable blitz from a 3-4 defense. Having a system of one word calls is helpful when facing an up tempo offense.

NHL Package


The call from the sideline is the name of an NHL team. The team name tells the LB where to make the Right/Left call to set the blitz.

The Rush:
OLB to the call blitz outside
DL slant away from the call

The Coverage:
Corners – 1/3
Safety to call – Rotate to Curl-Flat
Safety away from call – Rotate to Middle 1/3
Inside Linebackers – Hook
OLB Away from the call – Curl-Flat


Sabres (Strong)
Make the Right/Left call to the pass strength (higher number of receivers)


Wild (Weak)
Make the Right/Left call away from the pass strength


Canucks (Closed)
Make the Right/Left call to the closed side (TE)


Oilers (Open)
Make the Right/Left call to the open side (away from the TE)


Flyers (Field)
Make the Right/Left call to the wide side of the field


Bruins (Boundary)
Make the Right/Left call to the short side of the field


Rangers (Right)
Make a Right call


Lightning
Make a Left call


Hurricanes (Heavy)
Make the Right/Left call to the offset back


This system allows the defense to easily make the call with one word from the sideline and one word on the field. Because every call has a logo the defense can elect to use a poster board call system instead of using verbal calls.


4-2-5 Read Out Blitz vs. Empty Formations

$
0
0
When facing an empty formation the offense has 5 potential pass blockers. It doesn’t take great mathematical abilities to realize the defense can simply blitz 6 and get a free rusher.


Here is a blitz concept to get the same guaranteed free pass rusher while only rushing 3.


Alignments:
  • LB’s in B Gap, with blitz demeanor
  • DT’s in A gaps
  • DE’s in C gaps

The DE's and LB's are bracketing the OT's, the DT's are bracketing the Center

Assignment;
  • DE and Mike read the block of the OT
  • Tackle and Nose read the block of the Center
  • Will and DE read the block of the OT

The Read:
The read is simple. Get off the ball and attack your gap. If the OL doesn’t block you keep rushing. If the OL being read attempts to block you drop out. 


Key coaching points:
  • Great get off on the snap. Attack then React.
  • Assume you are a rusher until the OL attempts to block you
  • Engage the OL before dropping out
  • Drop to max depth of 5 yards. You can be slow to go and still get there.

If the OL uses a half slide protection.


Both OT's block the DEs so both DE's drop out. They are looking to drop into any hot throw by the most inside receiver. The Mike is unblocked and gets a free run to the QB. The Nose is dropping directly over the center.

If the offense uses a full slide protection.


Here the End is unblocked and gets a free run to the QB. The DE, Tackle, and Will drop out into possible hot throws.

The interior droppers allow the DB's to play outside leverage on the receivers. An unblocked rusher guarantees a quick throw from the QB. The interior droppers should take away any inside breaking hot throws. The outside leverage of the DB's should limit any outside breaking hot throws.

Creating Pass Rush Opportunities for the DL in the 3-3-5 Defense

$
0
0
One of the questions that inevitable comes up in any game plan meeting:

How does our defense get our best DL into optimal pass rush opportunities?

One solution is to combine a blitz and a twist concept in one call to create a one on one pass rush opportunity. Here is an example of this concept from a 3-3-5 defensive alignment.


The Rush
DE’s – Long stick to A gap
Nose – Slow to go, attack Center, loop to contain
Sam – Contain Blitz
Mike – Blitz B Gap

The Coverage
Corners – Tight 1/3
FS – Middle 1/3
Will – 3RH
SS/WS – Seam

vs. 3x1
Corners – Tight 1/3
WS – Middle 1/3
FS – 3RH
SS/Will – Seam


Against a half slide pass protection to the blitz:


The center is the key. If the center holds space on the Nose the defense has a 3 (Sam, Mike, DE) vs. 2 (LT, LG).


The more likely outcome is the center sets aggressively to the blitz. 


The guard opposite the blitz is forced to aggressively set to the Nose. The aggressive pass sets of the center and guard create a large pass rush lane for the DE on the inside move.


Against a half side the OT has the DE opposite the slide 1 on 1. With a huge amount of space for the DE to operate the OT has a very difficult block to make. This is especially true if the 1 on 1 DE is the defense’s best defensive lineman.

If the OT is able to handle the DE in the 1 on 1 block, the Nose has a short porch to loop for contain.


One solution offenses may employ is to have the RB chip the DE. An easy solution for the defense, is to call the same blitz with a different coverage. Here the defense uses a cover 1 concept. 


The non-blitzing LB (here the Will) is man to man on the running back. By using a rush engage coverage concept the defense is able to create an overload blitz to the RB.

The concept of combining a blitz with a twist can be applied to other blitz patterns.


Any 2 linebacker blitz can be complemented with a twist concept away. 

Under Front Weak Side Blitzes

$
0
0
Here is a package of complementary blitz patterns from the same under front alignment. These blitzes are from the 1999 Texas A&M Defensive Playbook. The Aggies used a 3-4 personnel but these blitzes are easily applicable to a 4-3 or 4-2 defense.

The blitz concept is from the Aggie's 53 front. 


Call DE  - 5
Away DE - 3
Nose - Call side 1

Sam & Rush Linebackers walked up

53 Dip


The Coverage - Cover Zero

Corners - #1's
SS & FS - #2's or #3
Mike - Running Back

The Rush 

Sam - Contain 
End - C gap vs. the run, Psycho B gap vs. Pass
Nose - A gap
End - B gap
Will - Tuff alignment on OT, Contain Rush
Rush - Loose alignment, Rush A gap

Psycho Technique


Against the run to the strong side the defense plays gap control. Against the pass the End executes a psycho technique to the B gap.


The DE rushes from the C gap to the B gap. This technique helps keep the End from being in the way of the contain rush of the Sam linebacker.

53 Blade


The Rush

Away End - A gap
Will - Tuff alignment on OT, X-It* to contain
Rush - Loose alignment, Rush A gap

*X-It technique is the Will attacking the tackle before looping to contain

53 Ox


The Rush

Away End - A gap
Will - Tuff alignment on OT, Contain Rush
Rush - Loose alignment, Rush B Gap

This package of blitzes gives the defense flexibility to attack the offense in 3 different ways from the same alignment. The defense could also choose to switch the alignment and responsibility of the Rush and Will.

Firezone Coverage Seam Technique Coaching Points

$
0
0
Long time Pittsburgh Steeler Defensive Coordinator Dick Lebeau (currently with the Tennessee Titans) is known for his firezone pressure package. Coach Lebeau’s 3 under 3 deep firezone coverage concept has been the topic of multiple posts on Blitzology in the past. This post is a continuation of those same concepts. The following information is from the 2003 Kentucky Defensive Playbook. The defensive coordinator was Mike Archer. Before his time at Kentucky, Coach Archer served as the linebacker coach for the Pittsburgh Steelers from 1996-2002. With Coach Archer coming from the Lebeau coaching tree much of the firezone terminology and techniques are similar.

This post focuses on the Seam Drop. Coaching points for this drop from Coach Lebeau were covered previously on Blitzology (Here).


The Seam technique from Coach Archer follows many of the same coaching points.


The basic structure of the 3 under 3 deep coverage is:

3 Under
Seam
3 Receiver Hook
Seam

3 Deep
FZ 1/3 Corner
Lean Post Safety
FZ 1/3 Corner

The diagram shows in the simplest form the responsibilities of the Seam player. If the #2 receiver runs:

Outside = Match
Vertical = Carry
Inside = Deliver

Coach Archer defines the Seam drop in the playbook. 

Seam Drop– Played in 3 underneath 3 Deep zones. Align inside or outside of the #2 receiver. Match-Carry-Deliver the deepest and outside of #2 or #3. Vs. a removed #2 with over split between he and #3 align inside and drop inside the #2 receiver and work to his outside shoulder – maintain vision and break. 


The seam player aligns 1-2 yards inside of #2 and 6 yards deep vs. a wide split between #2 and #3.

Coach Archer goes on to define Match-Carry-Deliver

  • Match #2 / #3 outside leverage on any flat release. 
  • Carry #2 / #3 outside in vs. any vertical route. 
  • Deliver #2 / #3 outside in on any inside release until forced to come off with either a call or another eligible crosses your face from the inside out


Here are some example diagrams.


Carry - Cover the deepest / outside of #2 /#3

The Seam player is working from inside to the outside shoulder of the vertical release of #2. The Seam player will only collision the #2 outside in and never inside out. All of the Seam player's help is inside from the 3RH and the Lean Post Safety.


Leverage with width and vision

The Seam player drops with width and then squeezing inside.


Match = Leverage first to the flat of #2 / #3

The Seam player is playing with depth over the first to the flat (#3). This should keep the Seam player in the window of any route by #1.


Against two releases in the same direction play deep to shallow.

By keeping depth over the first to the flat the Seam player is still in body position to play deep to shallow on the #2 and #3.


 Deliver #2 inside until another color crosses your face outside.


Match & Carry
Match the first to the flat of #2 / #3
Carry any flat and up


Vs. Flood = Lock #2


Flood = 3 Receivers releasing into routes to the weak side of the formation

Lock – Puts a defensive player “locked” on a receiver regardless of receiver’s release 

If the #3 receiver is releasing away from the Seam player the Seam player locks on the  #2 receiver and covers him man to man.


Against any D area motion the Seam player locks the #2


Firezone Coverage vs. Action Passes

$
0
0
This post is continuing the coaching points for 3 under 3 deep Firezone coverage. These coaching points come from the 2003 Kentucky playbook of defensive coordinator Mike Archer


Firezone vs. Boot


  • Corner to the action - Cover all of #1 out or vertical
  • Seam player to action - First to the flat
  • 3RH - Find and cover the crosser
  • Seam player away from the action - Throwback. Alert or the running back or crossers coming back 
  • Corner away from the action - Cover all of #1 vertical
  • Post Safety - Alert for the deepest crossing route

Zombie 

Call alerting Safety and Backside Corner #1 strong is in a crack alignment. 
Vs. flow pass, FS will rob dig if TE crosses and backside corner will drive to the post

Flow Pass = Play Action pass with both backs to the TE and the TE running a crossing route


Against a play action flow pass with a crack alignment of of #1 the defense will make a Zombie call pre-snap.


When the #1 receiver strong goes in crack motion the Corners and Post Safety must communicate with a "Zombie" call.

The Zombie call allows the the Post Safety to rob the dig. If the 3RH player is fooled by the play action fake the defense is still able to cover the levels route from the offense. The Zombie call tells the backside corner to overlap to the middle of the field and double cover the post with the other corner when #1 on his side runs a dig.

The defense would make the same Zombie call vs. a #1 aligned in a reduced split crack alignment.


Here the offense aligns with #1 in a reduced split. The defense makes a Zombie call to alert the Corners and Safety of the reduction of splits. The post safety robs the dig when the TE runs the crossing route. The Corner overlaps when his #1 runs the dig and double covers the post.

Zombie can be a good solution in a 3 deep coverage concept to handle play action and cover the levels route combination. 

4-3 Under Front Crossfire Blitz

$
0
0

The Rush
End - Contain
Mike - First, Blitz B gap
Sam - Second, Blitz A gap
Nose - Opposite A
Tackle - B Gap vs. run, Contain vs. pass

The Coverage
Corners – Tight 1/3
FS – Middle 1/3
SS- Seam
Will – 3RH
End – Seam

The same blitz can easily be run with man coverage.


The crossfire action of the Mike and Sam can create confusion for the offense’s blocking schemes. The issue for this blitz is what to do when the offense has a three man surface. 


The defense runs the risk of being badly out leveraged on outside zone, pin & pull, or other perimeter run schemes.

If the offense aligns with a TE or H back to create a three man surface the Sam adjusts.
The Sam aligns in the normal under front 9 technique. Against the run the Sam blitzes outside and contains. 


The Will can easily play to the A gap on any flow to the TE.

Against the pass the blitz returns to the normal crossfire pattern. The Sam blitzes under the End and Mike to the A gap.


With a simple adjustment by the Sam the blitz can remain sound vs. the run and create the crossfire action vs. the pass.

Spread Offense Smash/Seam Read Passing Concept

$
0
0
I have always coached defense. However, I thought I would share a passing concept I would run if I ever end up coaching on the other side of the ball. Even if that never happens, it does not hurt to study what offenses are running. So here goes.

The route combination is a smash concept to the field with a seam read and a vertical peel concept to the boundary.


The route progression for the QB is:

Peek the Vertical (X)
1. Field Corner (Y)
2. Seam Read (S)
3. Vertical Peel (X)

The Peek is a pre-snap read used vs. a press man look. 


The QB can throw the outside release vertical to the X as a 1 on 1 winner route. If the QB likes the matchup he can take it, otherwise he follows his normal route progression.

The first post-snap read is the field corner. If the corner sits in the flat the QB will throw the corner route to the Y.


If the corner sinks the QB works to the S on the seam read route. The S is running 2 yards outside the NCAA hash. As he runs vertical, he is looking at the middle of field (MOF). If a safety is aligned in the MOF or rotates to the middle, the MOF is closed. 


When the MOF is closed the S stays in the seam and should expect the ball thrown on a line as he clears linebacker depth.

As the S is running the vertical and there is no safety in the MOF, the MOF is open. 


When the MOF is open the S breaks his vertical to a post and should expect the ball in the middle of the field.

The 3rd route in the progression is the vertical peel. The X runs an outside release vertical. If he gets press coverage he must be ready for the ball on the peek throw from the QB. If there is no press, the X is running vertical reading the coverage of the corner. If the X beats the corner and gets on top, the X continues to run vertical. If the corner is over the top of the X’s vertical route, the X will peel the vertical back to a comeback route at 12-15 yards. The 3rd route in the progression is thrown when the defense is running a hybrid coverage. 


In this example a pattern match cover 3.  If the field corner sinks, the QB works to the S on the seam read. If the S is being matched vertical by a safety or linebacker the QB will work the X as the 3rdread.

Switch:
The route can be tagged with a switch call to switch the route of the X and S. The S now runs a wheel & peel while the X runs a seam read. 


This tag is good against a safety getting width when #2 is out like Cover 2 and 2 read coverages. As the safety works for width to get over the top of #1, the X is working to the seam and breaking to the post. The switch call can also be good against man or matchup zone coverages. It can be difficult for the defenders to navigate the traffic of the wheel and seam read as they cross.

Alert:
Another tag is an Alert for the hitch. This can be used in on schedule situations (1st&10, 2nd Medium, 3rdMedium/Short). The goal of an alert call is to throw the hitch. The alert tag tells the QB he can throw the hitch is there is space. 


The QB makes a pre-snap read of the field side coverage. If the corner is soft and there is space to throw the hitch the QB can throw the hitch. If throwing the hitch, the QB will not take a 5 step drop and will instead throw with 3 step tempo and footwork. If there is no space or if the QB is unsure, the QB will use the normal footwork and route progression.


Against teams that disguise their coverages or rotate to coverages at near the snap, I would run this route from a Polaroid tempo. I call it Polaroid because the QB will let the picture develop. The offense will line up and hard count. The offense does not look to the sideline following the hard count. The hard count is used to let the offense see the defense. The QB is looking at the coverage for a clear picture of safety rotation, bail corners, etc. The seam read receiver can start to see the MOF picture as well. Following the hard count the offense will immediately start the real snap count and run the play. Polaroid tempo prevents the defense from changing the call after the freeze. Polaroid is good for the base play or to allow the QB to see if the alert hitch has space.

Weak Side Fire Zone Corner Blitz from a Hybrid 4-3 Under Front

$
0
0
This blitz is from the 2007 USC Playbook from the Pete Carroll Trojan defense. The USC defensive front used a hybrid 4-3 / 3-4 concept. One of the DE's is a hybrid player who can play as a traditional hand on the ground defensive end. That hybrid DE also allows the defense to transition to a 3 man front concept by playing that DE in a 2 point stance. 


FIELD COWBOY 3 SEAM


Field sets the nose to the field and the 3 technique into the boundary. The boundary DE (here the right DE) is the hybridized player.

The Rush:
Cowboy - Blitzes the Corner & the Will from the Boundary

Field DE - Contain
Nose - Field A gap
Tackle - B Gap
Will - Blitz A
Boundary Corner - Blitz Contain

The Coverage:
3 Seam is a 3 under 3 deep fire zone coverage concept

Sam - Hot 2
Mike - Hot 3
Boundary DE - Hot 2
Field Corner - 1/3
SS - Middle 1/3
FS - Boundary 1/3


If the offense aligns with a #2 weak at TE the defense is able to keep the blitz and the coverage intact.


With the blitz coming from the boundary, any 3x1 formation to the field can be handled without any adjustment. The Mike is able to handle dropping off of the #3 receiver to the field. The blitz and the coverage operate without any checks, changes, or adjustments.


Against a 2x2 formation with a split #2 receiver into the boundary the defense shows its flexibility. The boundary DE makes an "Okie" call. Okie moves the Tackle to a 5 technique. The hybrid DE walks out and is able to align as an OLB to execute his pass drop on a split #2 receiver. The Boundary corner has a difficult path to blitz with the DE and split #2 in his way. To solve this problem, the FS makes a "Sheriff" call. Sheriff means the safety is now blitzing instead of the corner. 

Pete Carroll's defenses with the Seattle Seahawks have featured this same concept of blending 4-3 and 3-4 concepts. Moving forward, hybrid players will continue to play a critical role in allowing defenses to innovate. 

FAQ - What is America's Blitz?

$
0
0
I thought I would attempt to answer a question I am asked frequently in e-mail. What is America's blitz? 

America's Blitz is a colloquial term for the following blitz concept:


The blitz is known as America's Blitz because "every" team in America runs it. I have also heard the blitz called the NCAA Blitz. The name similarly implies that every college team runs this blitz. While not every team is running the blitz it is very common. Looking in a few NFL and college playbooks here are a few examples of the America's Blitz concept.

This example is from long time Pittsburgh Steeler defensive coordinator Dick Lebeau.


Here it is from Mark Dantonio's time as Ohio State's defensive coordinator. This variation of the concept is being run from a 3 man line sub personnel with multiple DB's in the game.


Here from Nick Saban's defense at Alabama in Base personnel.


Another example of America's blitz from Coach Saban being run out of sub personnel Nickel or Dime.

Here from Bo Pelini's Nebraska Defense

From Rex Ryan's NY Jets Defense


It doesn't take long to see why this concept is known as America's Blitz. 

Why is this blitz concept so ubiquitous? Simple answer it is effective. The deeper answer is versatility.  This blitz concept can be run from nearly all base and sub defensive personnel groups. Defenses also have the flexibility to play man or zone coverage behind this blitz. 

The blitz also has usage versatility. The blitz successfully attacks both run blocking schemes and pass protections. Defenses who carry this concept into a game plan can have confidence this blitz can be effectively called in multiple situations.

The success of the concept comes from the blitzes ability to overload half of the offense, attack the blocking scheme, and adjust based on the offense's blocking.


The concept is simple. The outside blitzer (Sam) is off the edge as a contain player. The DE to the blitz is slanting to the A gap. The inside blitzer (Mike) is letting the DE clear first and blitzing the B gap.

Several situations can play out based on the offensive blocking scheme.

The first situation is the offense zone blocks to the blitz. The zone could be either a zone run scheme or zone pass protection.


If the offense is disciplined in their zone blocking the offense has a blocker for each defender in each gap. In this situation the Sam, Mike, End, and Nose all have excellent gap leverage and the ability to shed blocks and make a play. This blitz challenges the offense to stay disciplined in their zone blocking.

The DE slanting to the A gap creates a conflict for the Guard. The Guard initially feels like the DE is attacking the B gap. In that case the Guard is responsible to block him. As the guard realizes the DE is actually slanting down to the A gap, it may be too late for the Guard to transition and make a good block on the blitzing Mike in the B gap.


The Center has a similar conflict. If the Center engages with the Nose at all, the Center's block on the DE slant to the A gap is very difficult.


Another situation is the OT blocks down on the DE slanting to the A gap. 


As the offense's blocking collapses down the defense has a 2 off the edge blitz concept. This situation can play out vs. both the run and the pass.

Versus the block down and kick out schemes like power the defense is able to get two blitzers to the point of attack.


As the OT blocks down the Mike is blitzing the B gap area. With 2 blitzers off the edge; the Mike is able to spill and the Sam is able to contain. 

Versus the pass the offense is likely running a slide scheme away from the blitz. If that is the situation the blitz creates a 2 (Mike & Sam) on 1 (RB).


Here is some video of the Dick Lebeau coached Pittsburgh Steelers running the concept. This video is courtesy of an excellent article about Coach Lebeau's Strong Scrape Fire Zone from Coach Hoover.


Game Management - When to Kick the PAT and When to Go for Two

$
0
0
You can never be too prepared on game day to make good game management decisions. Here is a quick reference chart for when to Kick the PAT or Going for 2.


This chart can be downloaded in an Excel file here.


The downloadable file also includes charts for running out the clock and for when to take a safety.

Combining Boot with Quick Game Passing Concepts

$
0
0
Here is another offensive passing game concept. The play is from a 3x1 formation combining a quick game passing concept on the weak side with a boot route concept on the strong side.


The route progression for the QB:
1 Hitch (X)
2 Corner (S)
3 Slam Flat (Y)
4 Run

If there is space to throw the hitch take it. 


If there is no space; the QB will pump the hitch and boot to the strong side. Typically if there is no space the offense is playing a 2 over 1 coverage concept to the weak side.

Weak Side Squat & Half


Weak Side Invert Safety


In either situation the defense is overloading the coverage weak. Against both looks the goal is to work the flood route concept strong.


The Z is running a skinny post. His route is designed to cross the face of the corner in man, cover 3, or quarters coverages. If the route is run correctly the skinny post should force the corner too deep and inside to play the corner route. The skinny post must be cautious not to break too far inside on the post. 


Against cover 3 or quarters the Corner may pass the post off to the Safety if the post break is too aggressive.

The S is running a corner route breaking at 10. The corner route must stay deep enough to high low the flat defender. If the flat defender can cover both the corner and the flat route; the corner route is not deep enough.

The Y is running a slam flat. The Y will hit the DE and release to the flat. The route is working to get width before depth. The Y will throttle the route at the numbers.

Once the QB runs the boot; he is reading high to low from the corner to the flat route. If both are covered the QB will tuck the ball and run.

Route Adjustments

By game plan the weak side Hitch can be adjusted to a Slant or Speed Out.


Strong side can be adjusted to any 3 man route combination.


The Protection – Full Turn Back Gap Protection

The protection is set to the 3 receiver side

Away Tackle – Cut C gap defender

Away Guard – Block back on B gap, No B gap threat = firm body position the A Gap with eyes on your B gap

Center – Block back on A gap, No A gap threat = firm body position the call side A Gap with eyes on your A gap

Call Guard – Block back on A gap, No A gap threat = firm body position the B Gap with eyes on your A gap

Call Tackle – Block back on B gap, No B gap threat = firm body position the C Gap with eyes on your B gap

A – C gap defender, block his outside number and seal the edge

Here is an example with the protection set to the Right:


The LT is the away OT and will cut the C gap defender (DE). The cut is designed to keep the DE’s hands down and out of the throwing lane to the hitch.

The LG has an immediate B gap threat from the DT and will block back.

The Center has no immediate gap threat in the A gap. The Center will provide firm body position on the call side A gap to help the RG. While holding position the Center’s eyes are in the away A gap looking for threats from a slanting DL or blitzing LB.

The RG has an A gap threat and is blocking back.

The RT has no immediate gap threat in the B gap. The RT will provide firm body position on the call side C gap to help the A. While holding position the RT’s eyes are in the call B gap looking for threats from the slanting DL or blitzing LB.

Another example, again with the protection set to the Right:


The LT is the away OT and will cut the C gap defender (DE).

The LG has an immediate B gap threat from the DT and will block back.

The Center has and immediate gap threat. The Center will block back on the blitzing Will in the A gap.

The RG has an A gap threat and is blocking back. When the Nose slants to the call the RG will let the slant go and block the new A gap threat from the blitzing Mike.

The RT will block back on the Nose slanting into the B gap.

Blitzing Zone Read from the 3-3-5

$
0
0
Here is America's Blitz from a 3-3-5 alignment. The coverage is a cover 3 firezone but it could easily be run with a cover 1 concept.


Against zone read this type of blitz can have some issues away from the blitz.


The defense can choose to have the DE step down with the OT's down block. The LB (here Will) plays over the top and takes the QB. If the QB makes the proper read the ball should get pulled and the Will should be there to make the play. The biggest issue with this situation is that forcing the QB to pull the ball makes the blitz obsolete. If the ball is getting pulled the blitz is attacking nothing. Many times this situation leads to the film room coaching conversation trying to answer the question "Why aren't we playing base and allowing the Sam and Mike to pursue like normal instead of blitzing them out of the play?".

The alternative is to have the DE stay square on the LOS, which should force the ball to get handed off. It makes sense to have the ball handed into the blitz. However, there are still issues.


As the ball is handed off the Will and DE are in a tough spot. The Will is fast flowing to defend the B gap. If the Will does not aggressively attack he risks being cut off from the B gap by the OT. If he is cut off the RB will hit in his back side B gap. If the ball cuts all the way back to the C gap the Will needs to redirect from fast flowing to the B gap. On the redirect the Will needs to press the OT back to squeeze the C gap. That is much easier said than done. The DE is also in a bind. If the DE is too wide as in the example; the running back has a cutback lane. 

The DE can squeeze down the space created by the OT releasing to the 2nd level to shrink the cutback lane.


The issue is even if the DE stays square; he is moving inside. If the QB reads that as a pull, the DE can be run around by the QB. Teams running zone read are often playing one of if not their best athlete at QB. A DE moving inside has a tough task to redirect and tackle the opposition's best athlete in open space.

One easy solution is to bluff the Will as a blitzer.


By bluffing the Will in the B gap the OT is forced to make his block at the LOS. Because there is less space created by the OT climbing to the 2nd level the DE can more easily play on the LOS. The DE will force the ball to be handed and still be in position to play the QB if he does pull it. If the RB tries to cut back away from the blitz the Will & DE can control the cutback because there is less space.

Walking up the Will plays out like America's blitz from a 4-3 under front.


Using a 3-3 with the Will walked up can have a nice effect vs. spread teams running boot or naked scheme passing.


The DE to the action is not being asked to drop. There is no run/pass bind for the DE allowing the DE to apply quick  pressure in the face of the QB. Another positive is the 3RH dropper is a LB not a defensive lineman. On most defenses the Will dropping from the LOS to find the crosser on a boot is a better coverage option than a DL.


Bunch Formation Chase Route Concept

$
0
0
Here is a 5 Step passing concept from a bunch formation designed to create an interior triangle read for the QB.


The route progression for the QB is:

Peek the Vertical (X)
1. Chase Route (S)
2. Dig Read (Y)
3. Drive Read (Z)

The Peek is a pre-snap read used vs. a press man look.


The QB can throw the outside release vertical to the X as a 1 on 1 winner route. If the QB likes the matchup he can take it, otherwise he follows his normal route progression.

The post-snap read progression is an interior triangle read.


The first route in the progression is the S on chase route. The S is letting the Z & Y clear while selling a flat route. The chase route is three hard steps outside, plant, and angle into MOF chasing the Drive route. The chase route is climbing to a depth of 5 yards.


If the inside linebackers drop with depth the chase route should be open.

The second route in the progression is the Y on the dig read route. The Y should take an outside release and break to the dig at 10-12. The Y is reading for open space to settle and square his numbers to the QB. If there is a zone dropper underneath; the Y will keep working inside until there is open space to settle. If there is a player running with the dig in man; the Y will keep running across. The Y does not settle the route vs. man coverage.


If the ILB takes an angle to cover the chase route; the dig should be open.

The third route in the progression is the Z on the drive read route. The Z is releasing at the heels of the DL and gaining ground. As the drive crosses the Center; the Z is reading the flat defender. If the flat defender is wide, the Z is squaring this shoulders and showing his numbers to the QB. On the away side the X is running an outside release vertical. Against press coverage the X will run a vertical and must be ready for the peek throw from the QB. If there is no press coverage; the X will turn the vertical into a comeback at 10-12 yards. The comeback is there is force the flat defender to widen.


Here the ILB’s take angles to take away both the Chase and Dig routes. The Z is reading on the drive route. In this example the FS is inverting to the flat. The X runs the comeback to force the FS to widen. The Z will settle in area of the OT. The max depth is 5 yards.


Here the flat defender is the Corner. Again the Z will settle & square in area of the OT.


Here the flat defender is the ILB expanding. Again the Z will settle & square in area of the OT.


If the flat defender does not expand to cover the comeback; the Z will keep running. If there is a player running with the drive in man; the Z will keep running across. The Z does not settle the route vs. man coverage. The Z will also keep running if any zone defender attempts to match up. If it feels like man coverage treat it like man coverage.

The A back is running a swing to widen the flat defender to the bunch and is not part of the read progression. While not part of the read; the A back must be ready for the ball in a hot throw situation. Against pressure the QB can throw the peek vertical to the X if he likes the matchup. The other hot option is to throw the swing route to the A back.


Adjustments

The route can easily be run from a 2x2 motion look.


Here the same concept from a 4x1 empty; forces the defense to handle and inside bunch and waste a coverage player on the A back. The A can run any route that forces the flat defender to cover him.


The route can be run from 3x2 empty as well. The A runs vertical to clear out space and take the top off the coverage.


Another option is to run the route from a 3x1 formation with the A back running the chase route. This can be an easy way to get the A back involved in the passing game.


In all of the adjustments the QB has the same interior triangle read.


Facebook

$
0
0
Blitzology.com now has a facebook page. Be sure to like or share.

Defending Trips with Quarter Quarter Half Coverage in the 4-2-5

$
0
0
This is the first post in a series about trips coverage adjustments. This is a 1/4 1/4 1/2 concept.


The Corner to the Trips is using Rattle technique. Rattle stands for Read Three. Corner is aligned 1x7 inside of #1 tilted. He is reading QB for quick game to #3.

The FS is also using Rattle technique (reading #3). The FS is aligned at 10-12 splitting the difference between #2 and #3. His initial footwork is a controlled pedal.

Rattle Technique


If #3 releases outside the FS will squeeze his coverage to #2, while the corner will squeeze outside to #1.


If #3 releases inside or vertical the FS will work to the middle 1/3 and the corner will squeeze #2 in the seam playing the outside 1/3.

SCiF Technique

The SS is aligned at 5 yards outside shoulder of #2 with a square stance. On the snap the SS will pop his feet and read through the EMLOS to the QB. His drop is SCiF (Seam-Curl-Flat). The SS has quick game routes to #2.

Against drop back pass if the #2 releases vertical the SS will stay square and collision #2. After collision the SS will pedal to a depth of 12 in the seam (2 yards outside the hash). 


While pedaling the SS will have his head on a swivel looking for the QB and receiving threats. If the QB tries to throw the ball on a line to #2 in the seam the SS should be able to make the play.

The SS will expand to the Curl and Flat if necessary.

If the #1 receiver is running a curl or in the SS should expand to cover him. The SS will only know to expand if he keeps his head on a swivel while pedalling. Also the Corner should give the SS an "IN" call.


If the #3 receiver is releasing outside the 3RH dropper (here the Mike) makes a "Push" call. The "Push" call pushes the SCiF dropping SS from Seam to #1's Curl and he should be ready to break to the Flat on the throw.


If #2 is inside immediately the SS will make an "Under" call and get depth in the seam.


If #2 is outside immediately the SS will top the flat route expanding from the Seam to the Curl and breaking on the throw to the flat.


3RH Technique 

The Mike is a 3 Receiver Hook (3RH) dropper and drops in relationship to #3. The Mike has quick game routes to #3.


If #3 is out immediately the Mike pushes the SS and expands looking for a route to cover coming back inside.


If #3 is inside immediately the Mike walls #3. We rarely see #3 running a route deep enough to wall. Typically the #3 is running very shallow. If the #3 is under 5 yards the Mike calls "Under" and gets depth to 12 with his head on a swivel for new routes entering his zone. The Mike can pass the under because the Will is in the weak Hook-Curl and should be ready to break and tackle any throw to #3 on the under.


If #3 is vertical the Mike collisions #3 if possible and will work to a max depth of 12. If #3 is vertical there will be a middle 1/3 safety so the Mike does not need to carry #3 vertical down the field.

If #3 tries to work to the backside hash the Mike will wall him. The Will is in the weak Hook-Curl to force the ball over the top where the FS and the backside Corner should have a play on the ball.

Those are the strong side drops. The next post will focus on Rattle coverage vs. common 3x1 strong side route combinations.

4-2-5 Quarter Quarter Half Coverage vs. Trips Routes

$
0
0
This post is a follow up to the Quarter Quarter Half trips adjustment post. This post focuses on the 1/4 1/4 1/2 coverage vs. some common 3x1 strong side routes.

Quick Game


The Corner is reading the QB for quick game. Against a hard shoulder action to the flat the Corner will trigger to #1's quick game route. The SS has #2's quick game and the Mike has #3.


The Corner will handle the outside vertical, squeezing the route into the sideline. The SS will handle #2's quick game. The Mike will handle #3's quick game.


The Mike will handle #3 on the quick game. The SS has #2's quick game which is the sit route by #1 on the quick exchange by #1 and #2. The corner will trigger on the QB's hard shoulder to the flat. The goal is to force the long throw to the flat where the corner should make the play.


Drop Back Passes

#3 is out so the Corner squeezes to #1 in his quarter. The FS is squeezes #2 in his quarter. The SS collisions #2 until he gets a "Push" call from the Mike. The SS pushes from Seam to Curl and breaks to the flat. The Mike expands looking for work. If #1's stays wide the SS covers both the curl and the flat route. If the curl works inside the Mike covers it.


#3 is out so the Corner squeezes to #1 in his quarter. The FS squeezes #2 in his quarter. The SS collisions #2 until he gets a "Push" call from the Mike. The SS pushes from Seam to Curl and breaks to the flat. The Mike expands looking for work, finding the inside curl. The SS must high low the curl to the flat.

#3 is out so the Corner squeezes to #1 in his quarter and should expect NO help on the post. The FS squeezes #2 in his quarter. The SS collisions #2 until he gets a "Push" call from the Mike. The SS pushes from Seam to Curl and breaks to the flat. The Mike expands looking for work, finding the inside curl. The SS must high low the curl to the flat. If the FS sees the Mike is expanding to cover the curl the FS can man turn and undercut the post.


#3 is vertical so the Corner plays the deep outside 1/3. His vision snaps to the outside receivers to find vertical threats. When #1 breaks his route short the Corner should make a "China" call. The Corner covers #2 on the corner route. The FS plays the middle 1/3 and squeezes #3's vertical. The SS collisions #2 until he gets a "China" call from the Corner. The SS immediately expands to the flat on a China call. The Mike drops underneath and inside the #3 vertical, collision if possible. 


#3 is out so the Corner squeezes to #1. With #1 releasing inside immediately the Corner will zone his quarter and cover #2's corner route. The FS squeezes #2 in his quarter and covers #2's corner route. The SS collisions #2 until he gets a "Push" call from the Mike. The SS pushes from Seam to Curl and breaks to the flat. The Mike will expand looking for work, finding the sit route by #1. 

#3 is vertical so the Corner plays the deep outside 1/3. His vision snaps to the outside receivers to find vertical threats. With no vertical threat the Corner zones his 1/3. The FS is playing the middle 1/3 and squeezes #3's vertical. The SS tops #2 playing in the window of the curl and breaking late to the flat. The Mike drops underneath and inside the #3 vertical, collision if possible.

#3 is vertical so the Corner plays the deep outside 1/3. His vision snaps to the outside receivers to find vertical threats. With 2 vertical threats the Corner midpoints the 2 verticals favoring the inside vertical. The FS plays the middle 1/3 and squeezes #3's vertical. The SS collisions #2 and gets depth in the seam with his head on a swivel. The SS expands to #1 if #1 converts his vertical to a comeback. The Mike drops underneath and inside the #3 vertical, collision if possible.


#3 is out so the Corner squeezes to #1 in his quarter and should expect NO help on the post. The FS squeezes #2 in his quarter and covers #2's out route. The SS collisions #2 until he gets a "Push" call from the Mike. The SS pushes from Seam to Curl and breaks to the flat. There is no curl but by pushing to the curl area the SS is underneath the out route by #2. The Mike will expand looking for work.

Screens

#3 is out so the Corner squeezes to #1 in his quarter. Once the corner snaps his eyes to #1 the #1 receiver is blocking. The corner will shed #1's block and secure the sideline. The FS squeezes #2. Once the FS snaps his eyes to #2 the #2 is blocking. The FS will run the alley inside the SS. The SS sheds #2's block and will force the bubble with outside in leverage. The Mike will expand inside out caging the ball with the SS.


#3 is out so the Corner squeezes to #1 in his quarter. Once the Corner snaps his eyes to #1 the #1 receiver is chopping his feet and selling a block. The Corner may react but by having his eyes on #1 allows him to collision and run with bubble & go. The FS squeezes #2. Once the FS snaps his eyes to #2 the #2 is chopping his feet and selling a blockThe FS may react but by having his eyes on #2 allows him to collision and run with the bubble & go. Film study will help the Corner and FS identify the difference between bubble vs. bubble & go. 


#3 is blocking so the Corner plays the deep outside 1/3. His vision snaps to the outside receivers to find vertical threats. With no vertical threats the Corner triggers to the screen and secures the sideline. The FS triggers and runs the alley inside the SS. The SS triggers straight up the field. If the SS gets any width he will get kicked out by the OL. By triggering straight upfield the SS either makes the tackle by beating the block of the OL or forces to the ball back bounce over the top inside to the rest of the defense. The Mike will expand inside out caging the ball with the SS.
#3 is blocking so the Corner plays the deep outside 1/3. His vision snaps to the outside receivers to find vertical threats. Once the Corner snaps his eyes to the outside receivers where #2 is chopping his feet and selling a block. The Corner may react but by having his eyes on the outside receivers allows him to collision and run with screen & go. The FS may trigger on #3's "block" but by having his eyes on #3 allows him to collision and run with the screen & go. Film study will help the Corner and FS identify the difference between wide screen vs. screen & go. 


Another simple adjustable 4-2-5 Fire Zone Blitz

$
0
0
This post is a follow up to the previous post about an adjustable 4-2-5 fire zone blitz. This blitz can be easily adjusted to get the blitz where ever the defense wants to apply pressure. The concept could easily be used in a 4-3 defense as well.

SHOCK - SS or Corner Blitz

The SS or Corner will blitz based on where the tag sets the blitz. This blitz is only run on a hash.

Shock Strong
The blitz is going to the pass strength (higher number of receivers)


The Rush
FS sets the direction of the blitz with a Right/Left call. In the above example a "Left" call. 

SS - To the call = edge blitz. This blitz can be either a contain or a spill by game plan.
Call DE - Long stick to A gap. Read the OG
Call DT - 2i Alignment, Long stick to opposite A gap. Read the Center.
Away DT - 2i Alignment, Slant to B gap.
Away DE - Contain

The Coverage
FS - Spin down to Seam is to the strength
WS - Rotate to Middle 1/3
Field Corner - Tight 1/3
Boundary Corner - Away from call = Tight 1/3
Mike - Always 3RH
Will - Always Seam

If the offense puts the formation into the boundary:


The Rush
FS sets the direction of the blitz with a right/left call. In the above example a "Right" call. 

Boundary corner - To the call  = edge blitz. This blitz can be either a contain or a spill by game plan.
Call DE - Long stick to A gap. Read the OG
Call DT - 2i Alignment, Long stick to opposite A gap. Read the Center.
Away DT - 2i Alignment, Slant to B gap.
Away DE - Contain

The Coverage
FS - Spin down to Seam is to the strength
WS - Tight 1/3
Field Corner- Tight 1/3
SS- Away from call = Seam
Mike - Always 3RH
Will - Always Seam

The blitz easily adjusts to 3x1 or 2x2 formations.


 Against 3x1 the Mike can bump to an alignment to drop off of the #3 receiver.


Against a 2x2 the Will can bump to handle the Seam drop on #2.

Shock Back
The blitz is going to an offset back. No offset back (pistol or under center = Strong)


FS makes a Left call to the back. SS is the blitzer and the Corner is in coverage.


FS makes a Right call to the back. Corner is the blitzer and the SS is in coverage.

Shock Tite
The blitz is going to the TE.  No TE  = Strong


FS makes a Left call to the TE. SS is the blitzer and the Corner is in coverage.


FS makes a Right call to the TE. Corner is the blitzer and the SS is in coverage.

Shock Motion
The blitz is going to the Motion.  No Motion  = Strong. This blitz is good vs. jet sweep and orbit motion teams.


 FS makes a Left call to the Motion. SS is the blitzer and the Corner is in coverage.


FS makes a Right call to the motion. Corner is the blitzer and the SS is in coverage.

This type of blitz is simple for the defense but very multiple. By adding a new tag word the defense can change where the FS will make the right/left call and get the blitz anywhere the defense want to pressure.
Viewing all 330 articles
Browse latest View live